It's about exploring and sharing my creative adventures (mostly sewing these days) ~
~those activities that sometimes obsess, usually inspire, occasionally frustrate
~and always provide a delightful maze to wander through.

Friday, December 30, 2011

2011 - What I sewed, what I learned...


I haven't made it into the sewing room to do anything of substance for...oh... 3 weeks or so now... so I decided it was time for a bit of reflection on the past year.   This was my first full year of sewing since I was a (very) young adult, and it was definitely a year filled with firsts for me - lots of lessons learned!

The tally:
6 pants
3 jackets
2 vests
4 shawls, wraps & such
3 knit tops (only THREE??   What happened there?)
3 skirts (for Mom)
4 dresses (all for others...I guess I'm still not a dress person)
2 pairs of pajamas (for Mom)
A bunch in the misc. category - belts, bibs, bags, baubles, berets....

Not really quite as productive as I had thought (but still...that's more than 2 per month, not counting all of the miscellaneous items & alterations, so not too bad, all things [aka~life] considered).  Plus, several projects were...well...PROJects!   Complicated, time-consuming, but lots of fun & definitely rewarding!


The biggest lesson learned really sank home while looking through the pictures of 2011's projects.  I realized that the items worn most have been all of the pieces in the above composite pic, made for Pattern Review's mini-wardrobe contest, and my Jalie Jeans.   Both of these filled a practical need, and the wardrobe contest made me think in terms of items that actually, well, made up a wearable, mix & match WARDROBE!   I mean, no orphans!   Who woulda thunk it?

I've been trying to pay attention to this ever since the wardrobe contest, but I do get distracted by bright shiny objects, like this one:

Definitely fun to make (although it had its challenges, to be sure) but I still need to make some items that expand its wearability factor.

There were a couple of bright shiny objects that also fit into the practical, goes-with-lots category, like this faux fur jacket - Lois Ericson's Cosmopolitan (made in January, but pre-blog, reviewed at PR):


A number of items made for others were gratifying and appreciated (*whew*)


A new TNT summer top, the Collette Sorbetto, was added to my repertoire:

And I tried my hand at silk screening (thanks to Marcy Tilton)

Other notables were a FINISHED UFO (from 2010, no less...), an introduction to the fabulous new Ausie company, Style Arc, and lots & lots of fleece, including this cute little bedjacket (which has also been getting a lot of wear)
 

My first Fail: (sorry Chloe)

Balanced by another Style Arc Winner 
(I still can't believe I only made THREE knit tops this year - 
I guess 2010 was the year of the knit top for me....)

A bright new table setting:

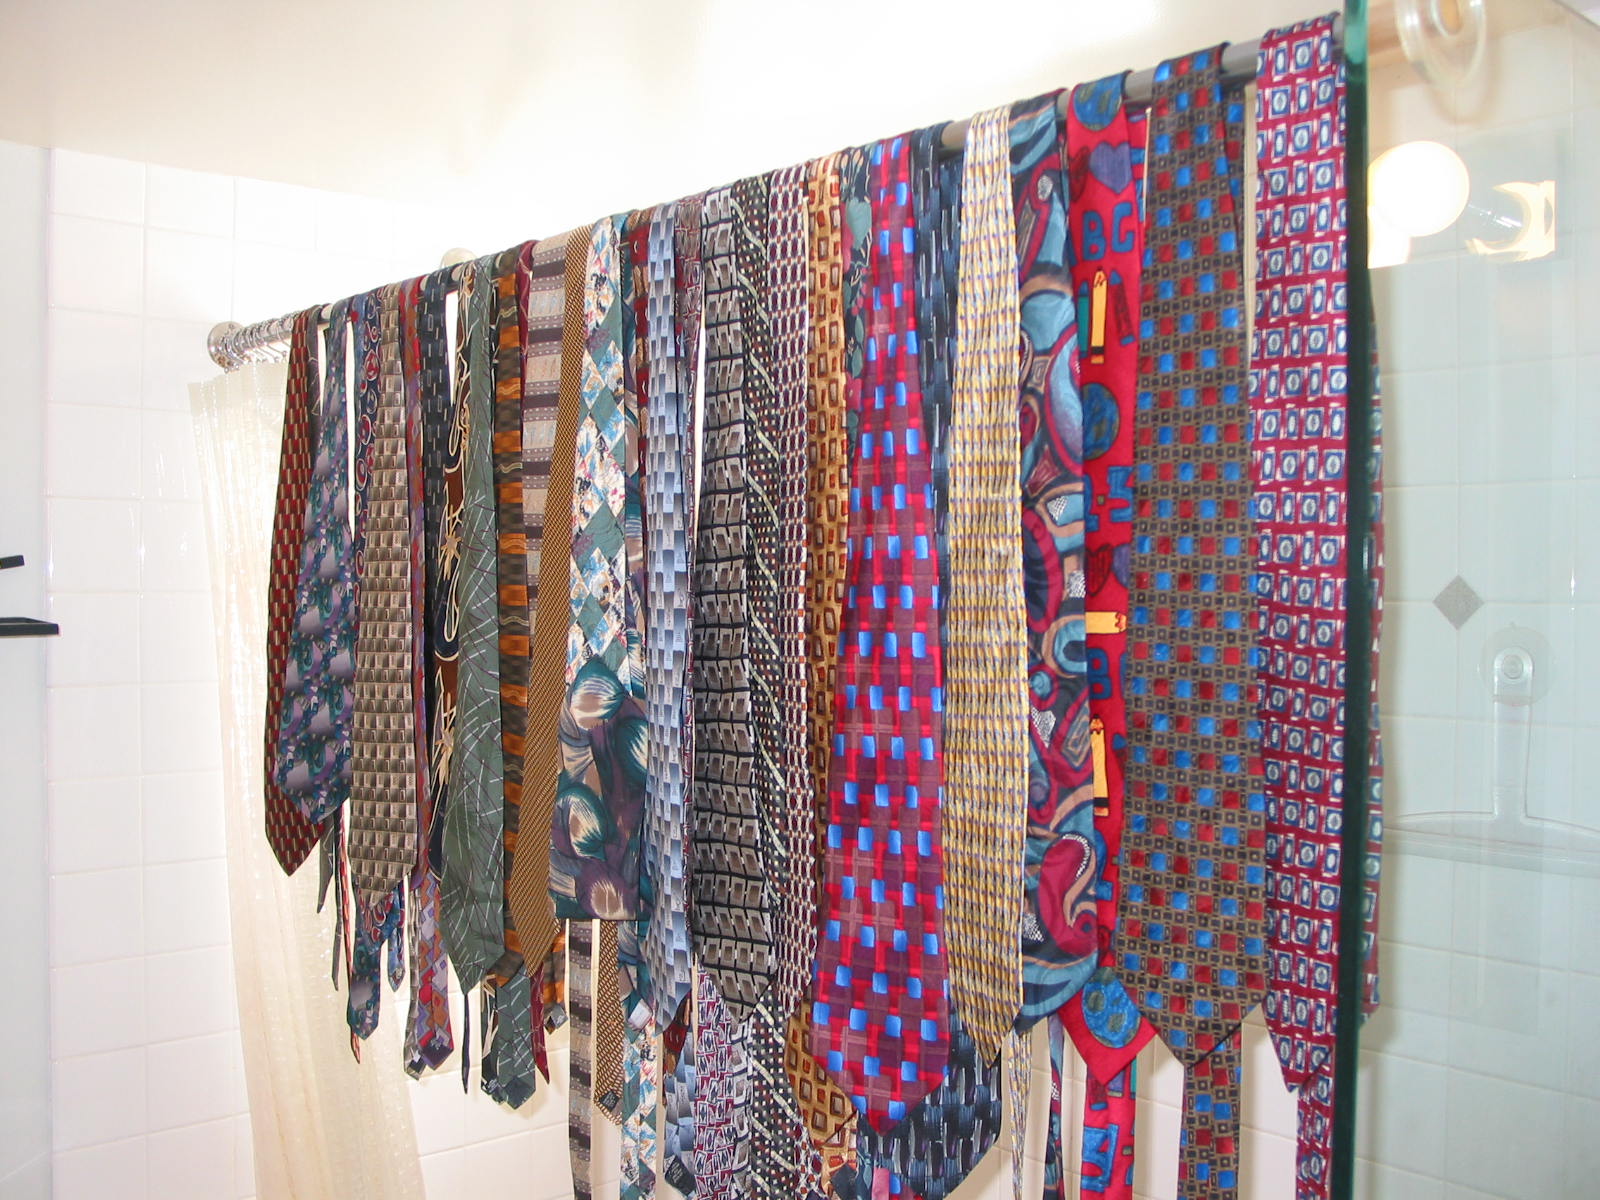
My latest obsession with ties, which promises a fair amount of creative productivity in the coming year:

And, of course, the current project (not counted above, after all, it's still a UFO).....
I hereby promise to me & the rest of the blogging world, the Koos Coat will be worked on this weekend!!!!
And by the way...this coat not only matches a whole lot of pieces that I already have, but is part of the Stitcher's Guild winter 6PAC, which means that several other matching pieces are ready to go (the 6PAC may or may not actually get finished in time, but that's beside the point...)  I really am trying to pay attention to making pieces that can be happily worn with other pieces I have, or am making.....  Really, truly, I'm learning this lesson!

Here's to lessons learned, and more importantly, remembered.   One lesson that is always with me is the value of community - I remain incredibly thankful for my online sewing community (many of whom are now a part of my 3D life) - I am so grateful for all you have given me :)  

May we all have a 2012 that is filled with abundance in many forms, and may we be blessed with lessons that help us learn, and grow, and become more of who we can be.

Happy New Year, dear sewing buddies!

Wednesday, December 21, 2011

All Tied Up with a New Obsession! (or two....)

The Stuff of Life has, once again, locked the door to my sewing room, but I will be getting back to the Koos Coat soon....very soon....promise!

Meanwhile, here's a taste of my latest little obsession....ties!   Ties!  And more Ties!

Ages ago I thought a vintage men's tie would have been the perfect item for some project or other (long since finished using something else), but alas, I had none.   So I've been slowly allowing them to follow me home whenever I ran into a stray, with vague ideas floating around the brain as to what I might actually do with them....

Then I ran into this delightful post over at Rhonda's Creative Life, and quickly whipped up one of her super easy obi belts:

This was perfectly timely, since I've also been obsessing over how to make some belts I would like (and NEED!)   A few minutes of hand stitching is all it takes, and it's truly a one-size-fits-all item, depending on how you tie it together.   I wore it the day after making it, and can't wait to make more!

This really kicked the slow collecting into obsession mode, and I now brake for thrift stores - and I know which ones charge as little as $.50 and which charge as much as $19.99 (for a used tie?  Don't THINK so.....).

I have numerous sketches and ideas for other belts, necklines, handles, facings....and I might even do a variation on the old necktie skirt....we'll see.....

On another note....I need to make some clothes to wear with.....here she is.....allow me to introduce....

Matilda Joplin!

I'll have much more to say about her as I come up with appropriate girly-biker clothes.  I'm picturing skirts -or skorts- a scarf flowing in the breeze, a cloche or some creative ways to disguise a helmet...   Of course, there are always the usual, 'appropriate', biker type clothes, but this is a girly bike, and I'll definitely be getting a wicker basket for the front, and I plan on dressing to the nines for certain biking occasions!  Like, you know, going to the Farmer's Market.....

I leave you with blessings and best wishes for the release of those dark bits of the soul that might be holding you back, and as the days get longer again, here's to bringing more light and joy into all of our lives....Happy Solstice Everyone!

Thursday, December 1, 2011

The Koos Coat - What I've Learned So Far


Oh, how I wish there were days when I had nothing to do but sew!!!  I am making progress, but it seems rather slow...especially when I think I'll be done with a certain stage in a couple of hours, and a day later, I'm only halfway there!  But crises have been averted, and I am, once again, really happy with how it's looking :) 

I do have a few notes to make, however.

Pattern Rating    
ADVANCED  Vogue's Definition: The finest patterns featuring the best of European and American Couture. Perfect for those who like the sewing challenge of professional tailoring and fine couture techniques. Expect intricate fashion shaping, hidden construction details, couture inner construction, fine touches of hand sewing and bias draping.

I don't know about the "couture" bit, and Koos isn't known for a love of tailoring, but in my somewhat limited experience, I have to at least partially agree with the rating.  I would just rate it "Not for the faint of (sewing) heart".  I do not, by any stretch, consider myself an "Advanced" sewist, so if I can do it (and I CAN!)....well, chances are, you can too :)

Fabric Choice
This is a lesson called "Do what I say, not what I did".   
I love all of my fabrics, really, I do.   But...... (biggify for the words)
I HIGHLY recommend choosing stable fabrics, all with similar weight and hand.   For construction ease, this can really save you some angst.   Of course, if you're like me, you're going to go for the colors, textures, and variety that speak to you, and just deal with the angst anyway.   Just don't say I didn't warn you!  

Also, I recommend a relatively thin fabric for the bias strip (mine was a bit thick....of course). :::rolleyes:::  Bear in mind that, once you start flat felling the sleeves onto the coat, you'll be going over multiple layers of fabric, especially when you start crossing the bias strips!

(Note that I didn't even mention the inside fabric in the above pic, which caused most of my angst......if you saw my previous post, you already know about that....)

Sizing and Alterations
It runs large.  I started with a Medium muslin, & ended up making a Small.
I only made 2 alterations.  One was on the Sleeve length, which I shortened at the wrist end, like so:
It's an odd-shaped sleeve;
I marked the shortening line to run perpendicular to the grain line,
& then trimmed the edges to smooth them out.  
After I had the body of the coat put together, one of those niggly little back-of-the-mind voices that had been whispering to me finally made itself be heard.   Loudly.  Notice the height of the collar on this model (who almost certainly has a neck that is twice as long as mine to start with).
I was drowning beneath this collar!   It either had to be folded over, or it would create its own fold all around the center of the collar.  Not a good look!  Luckily, I was still at a stage where I could unpick the stitching & cut down the height (by over 1")...I made an 'after the fact' notation on the pattern piece:

The overall length is closer to coat than jacket (at least on my 5'4" [almost] frame), much longer at the back than at the front, but I'm fine with the length as is.   You could just trim the bottom of it off if you wanted it shorter.   Which I would probably wait to do until after you had all of the piecing done....it could be a little tricky figuring out just how it falls until you have it to a point where you can at least pin the body of it together.

Flat-Felled Seams
I remember doing these early on in my former sewing life.
Not much though, because mostly I remember hating doing them.  
Clearly, though, it was time to change my attitude, since all of the remaining seams in this jacket need to be flat-felled.   The problem (for me) was how to deal with 4 thicknesses of wool fabric being sewn & folded (making 6 thicknesses for the topstitching...even more when you start sewing over the bias strips!)

After trimming the inside SA to a scant 1/4", I decided to trim the inside fabric of the outer SA as close as possible to the seam line.   This means I would only be folding over one thickness, instead of two (Did that make sense?)
SA on the upper side of the pic is a full 5/8"
The next layer of fabric is trimmed right next to the seam
The two fabrics on the other side of the SA are trimmed to a scant 1/4"
 For the pressing portion of the seams, I decided to use a technique I learned when working with slippery silk charmeuse.  I folded the wide seam over & pinned it in place directly on to the ironing board, using glass head pins, & poking them in at a sharp angle.

Steam & Press it into submission, then let it rest until it's cool:


The finished, top-stitched result - I'm happy with it!  

I'll leave you with a shot of the ugly truth of the scene on the inside, soon to be hidden (hopefully!) beneath the pocket.  (But don't show this picture to anyone else, OK?)


Next up:  sewing the sleeves on to the jacket, making the pocket welts, installing the pockets, and ... dare I say it ... completion!!!!


Monday, November 28, 2011

The Koos Coat - The Good News/Bad News Post

The Bad News:  In spite of laying the two sides (inside/outside) together & matching them up perfectly, (which involved only a tiny bit a trimming, once I started basting them together they somehow no longer matched up.  At all.   WTF?   :(  In fact, I had a chunk of excess fabric on the reverse side that I could have made a sleeve out of.

The Good News:  OK, so I exaggerate a bit....I approached it with a "Yes, I Can Do" attitude, & in a little stroke of brilliance I realized that I could take a dart in the fabric, and place it so that I could disguise it with the Top Stitching - YES!

The pinned dart (although it did get moved & adjusted after this pic)
The Bad News:  I machine basted (with a walking foot) several lines from top to bottom, connecting the fabrics, & it became clear that, even though everything pretended that it was matching up,  puckering was going to happen anyway.   The tweedy tan wool blend on the reverse side was stretching out a little bit more every time I looked at it, no matter how subtle I tried to be.   :(

The Good News:  Steaming and Pressing the sucker into submission appeared to be taming it!


The Bad News:  I started topstitching (with walking foot) along the bias strip lines (I really wanted to be working with the expanding tan fabric on top, but in order to have the guide lines to work with, I really needed to start on the pieced side).   Everything seemed to be going well, until I got to an area where the steaming & pressing just wasn't doing the trick.   YARDS of excess fabric started appearing!!!!   Well, OK, maybe it was inches, or perhaps it was really centimeters (I'll never, ever get centimeters & quarter inches figured out....which one is bigger?), but still.   Way.  Too.   Much.

I went to bed.

The Good News:  In another flash of inspiration, I realized that the excess fabric was all appearing right about where the pocket would be placed!   I checked it today, and sure enough, it looks like I may be able to coax the folds underneath the pocket.   :::whew:::
If you biggify the pic, you may be able to see the dart (near the armhole at the top)
and the thread tracing around the pocket edges.   I think I can save it.....
The Bad News:  I may end up with a one-sided coat, not reversible.   But the semi-good news is that it's actually OK, since I probably would wear the pieced side out 90% of the time anyway.

I guess, when it comes down to it, it isn't really a Jilly Be project if it doesn't involve a couple of unexpected side trips along the journey...

The Good News to end with:  No matter what, I'm committed to enjoying the journey! (side trips & all....)

Hope all of your unexpected side trips are pleasant and fulfilling!

Saturday, November 26, 2011

The Koos Coat! - In Process (and A Secret...)

I am THIS stoked about this pattern (Koos Van den Akker's Vogue 1277)!   Seriously, this is the most fun I've had on a sewing project....maybe ever!    This was a pattern I fell in love with the moment I first laid eyes on it.  Reversible, all sorts of room for creative fabric placement, and I loves me a great swing coat, especially one with such a fabulous, updated look:

Now, as far as I'm concerned, no one does the extremes of Is it Ugly or is it Fabulous quite like Koos.  Case in point:
I know that beauty is in the eye of the beholder & all that...
but seriously?  He's done worse (imho, of course), but this is the only one
that's still currently available.

Back to The Coat...

Choosing fabrics was step one.   Challenging?  Oh yeah....  Fun?  You betcha!  I started by shopping my stash, & filled the missing pieces in from here & there, laying them out, moving them around....

And eventually ended up with this:

Which evolved into this:
(The fabric bit sticking out on the right is the sleeve)
Once I had the bias trim laid out on it, I was loving the combination!

The pattern instructions, by the way, are very clearly laid out.  I've heard that Vogue gave instructions that are totally different (and more complicated) than Koos teaches it, but I've had no problems (so far) following anything.

Well, except for the bias strip pattern piece & instructions.   I should have been able to tell at a glance that those were written by someone from Pluto...or someplace...but I wasted time trying to decipher them anyway, before I just did it my way.   I've posted this method before, but I'll show my super easy way of cutting a bias strip here:
Once you have your bias tube sewn up, you simply insert a small self-healing mat inside the tube.   This way, you can lay a clear ruler on the edge of your tube, & cut accurate edges (to the width of your choice), using a rotary cutter.   After you cut a section, simply slide next section of the tube to the top of the mat, replace your ruler, and cut another section.   Accurate widths for the full length of the strip, without having to mess with scissors!   (I promise I'll do a full tutorial on this.....one of these days..... but there are already a lot of tutorials on cutting the fabric & sewing up the tube.   I've just never seen this method of inserting a mat inside the tube for cutting before)

Anyway, back to The Coat....

The instructions call for sewing the fabric pieces together WRONG SIDES TOGETHER.   After trimming your seams, you then lay your bias strips on top of the seams & top stitch each edge of the strips:
I thought this was kinda cool...no worries about getting off kilter
with your SA's on the other side of the fabric,
and everything looks finished, even on the unseen part!

Here are the pieces all sewn together & long edge stitched, connecting both sides of the coat 
(this is the WS of the fabric showing)
Inspector Sir Fur Purr seems to approve.
(Yes, cats are allowed to shed all over my fabric.  That's life with cats.  I got over it long ago)
This shows the reverse side.
After sewing the two sides together along the outer edge (RS together), you turn it through the neck/armhole opening, and baste the opening's raw edges together.   Here's where I'm at now:


The next step is All.   That.   Topstitching!   My only concern is how to get the topstitching done w/o puckering happening....   I'm practicing on scraps, but I still don't feel totally confident that I can keep both sides nice & smooth on the full lengths of All.   Those.   Lines.   

Any tips or hints will be gratefully received!

Oh, yes, I promised to reveal A Secret!   Here it is.   See how simple the main body of the coat is, w/o all of the pieces?    This fabric was actually "Muslin" #2.   I did up the first one (out of an old tablecloth) in a Med = too big.   So I decided to cut a wearable Small from fleece (I loves me my fleece, as many of my readers probably already know), and finalize my sleeve adjustments (they needed to be shortened) & check the overall fit before cutting into "The Good Stuff".

You say you don't want to fiddle with all those pattern pieces, or don't like the fabric matching game?   But you like the lines of the coat?   Well, here's The Secret.  Once you've connected your pattern pieces together, you can cut this out in a thick, double-sided fabric, stitch it up, finish your seams, & you can actually have a wonderful coat in a couple of hours!   Add pockets if you want, or line it, or make it reversible with another solid piece, and it's still an easy project!

Here's my fleece coat....this one is totally unfinished; I do plan on having some embellishing fun with it, & lining it with something else, but this can give you an idea of the possibilities:

My goal is to have the coat done by the end of the month (just a few short days away eek!), but hopefully I'll have most of the day tomorrow to work on it.

Wish me luck with the topstitching!