It's about exploring and sharing my creative adventures (mostly sewing these days) ~
~those activities that sometimes obsess, usually inspire, occasionally frustrate
~and always provide a delightful maze to wander through.

Saturday, January 29, 2011

Sew & Learn...& Learn...& Learn....

....aka, there is no substitute for experience.   Especially for those of us who just HAVE to try it for ourselves, even when we've been told that xyz isn't such a good idea.   Or, sometimes, just BECAUSE we've been told that xyz isn't such a good idea......

I've been head over heels with Decades of Style patterns since my re-entry  into the sewing world (after a 20-year absence from fashion sewing of any sort); in fact, the very first thing I made was the DOS Collar Confection blouse, Reviewed here at Pattern Review   So when a few new DOS patterns were issued, I jumped on the 1950's Stole!


There are only 4 pattern pieces - easy peasy!

(I tried to take better pictures this morning, but it looks like my camera battery is on its way out....hopefully it's just the battery, because I'm not ready to replace the camera just yet!  I wonder what the life span of a digital camera is.....)

Note:  Instructions say to cut Main Fabric and Lining w/ Right Side Up, but the Lining needs to be cut WRONG side up!  - I think there was a note added to the pattern packaging about this.


I made a wearable muslin first, in a size small, thinking it might be a nice warm winter wrap for the Mumsy.   It turned out quite nice.  Too bad it doesn't really work for her & she won't wear it.   Can't win 'em all!

I snipped & sewed the first one in no time.  I did have a few question marks trying to wrap my brain around the unusual layout of the design (& the sleeve is where exactly?  & the back is which side???)   I do recommend putting a little marker or label at the neck back, so that it's clear which side is the back...even after you've worn it a few times it can take a moment to figure it out as you're putting it on.   Here's the Mumsy wearing hers (which she only put on for the picture...I'm afraid it needs to find a new home, since it just didn't work for her, and it's too small for me)

The small (which was done in a stable woven mystery fabric, with a lovely silk lining), was a bit too small for me, so I decided to make mine in a Medium.   So far, so good, right?
Close up of Buttons.   These are actually plastic reproductions of those vintage thread buttons - For a really perfect match I'll find some real ones!


In the end, I LOVE this shawl!!!   I'm actually wearing it as I type, and it's been a perfect wrap to wear around the house on these cold San Francisco winter evenings.  It's casual enough to wear pretty much anywhere, yet could easily be dressed up as well.   In spite of the extra time I spent learning my lessons about matching fabric to lining, and learning a bit more about what stretchy stuff will...and will not...do, I'm really happy with the result!

....So I dove right into cutting my lovely wool blend knit, & was so pleased that I had this stretch bemberg lining that was a nice match!  Now, I knew at the start that the bemberg didn't stretch nearly as much as the wool knit, but I thought maybe it would just help stabilize the knit....right?   Sounded logical to me....  Snip Snip, Sew Sew.....hmmmmmm......things aren't matching up very well......the wool stretches.   A lot.   The bemberg stretches.....not so much at all.   No worries, I'll make adjustments....it'll work.

Even after adjusting here...there....pretty much everywhere.....I STILL ended up with little puddles of excess fashion fabric at the edges, but I'm not going to let a little thing like that stop me.   (Call me stubborn & determined....and willing to unsew & unpick....a LOT....but I haven't had a wadder yet!)  I figured I could solve this by topstitching around all of the edges, & that would at least stabilize it enough to make it wearable.

But before that....

On to the next issue.   Do you know how SLIPPERY bemberg can be???  especially when it's sliding all over another rather soft & slippery fabric?  No way did this shawl want to stay in place!   I flipped it this way & that way, & tried to analyze ways to keep it in place.....& tossed it over the dress form & walked away.   Several months ago.   UFO.  (I thought that stood for UnFinished Object, but I can think of a few other phrases....)

Finally, last week, it was time to take another look.   I had discovered the triple stitch!!!!  I think most modern machines have this - it's the 3 side by side stitches, a straight stitch, but it has a lot of stretch built into it.  It makes a great top stitch if you want a beefier looking stitch, & it was PERFECT for my needs in this shawl!

Here is the pocket flap - you can get an idea of what the finished stitch looks like.  And also the yummy wool blend fabric (I really do LOVE this fabric!   It has rows that are pinched & stitched, & it's actually very sheer in between the rows):
Once the topstitching was done, everything really did fall in place & stabilize much better.  

Of course, there was still the slippery factor.  Once I put my clothes on, I really don't want to be fussing with them, adjusting, futzing, realizing that something is falling off & exposing....you know....wardrobe malfuncions.....just doesn't work for me.

I decided the best way to deal with this was buttons.   So after much playing around &  pinning & unpinning, I decided two buttons were needed, took a deep breath & sewed up the buttonholes, found two "faux vintage" buttons that were almost perfect (until I find two "real vintage" buttons that are more perfect) & I have an FO!!!!   

I may I need to replace these pics in daylight - my flash was woefully inadequate, for some reason.  but for now:


With hand through the pocket flap

Just a'hangin'.....

Kitty is helping

Fuzzy with movement, but I kept this just to show how well the shawl moves - and even stays in place!


This shows the layout of the piece (sort of...if you can figure it out...)   The sleeve is upper left. The flap with the buttons crosses over the chest, & over the shoulder to lay on the back.  The flap with the buttonholes lays across the back, then flips over the shoulder to lay across the front.   Clear as mud?

Buttons & buttonhole placement

Monday, January 24, 2011

Sewing Adaptive Clothing - Mom's Wrap-back Dress


Much of the  sewing I've done this past year consisted of attempts to make clothes for my Darling Mum who, at 96, is still a positive inspiration in my life.   Her bones & muscles are rather wonky, thanks to rheumatoid arthritis, which has left her body pretty weak, but her sense of humour and her dignity are still fully intact - my goal in sewing for her is to help her keep that dignity as much as possible, and help her maintain a healthy level of independence.

Her favorite piece of clothing at the moment (and pretty much all she wants to wear!) is a dress I made her a couple of months ago; the dress I'm blogging about here is my attempt to fine-tune the pattern, and give her a break from wearing the same thing all the time!  ;-D.

Here's the basic idea:  She needs help getting dressed, but during the day, she can walk around on her own (with a walker), and use her commode on her own, but she simply doesn't have enough strength in her hands to grip a pair of slacks & pull them up - we tried light weight fabric, easy zippers, different elastic waists; while those solutions worked for awhile, they didn't last long.   We tried a wrap skirt, but decided that the waistline needed to be higher than her waist, so that didn't work well.  The best solution at the moment seems to be an open backed dress, which allows her to simply pull the sides forward when she needs to, and then let them fall back into place without any extra effort on her part.   The main trick with this is getting the ends of each side easy enough for her to pull forward, and yet giving full coverage when it falls into place.   A classier & public-worthy version of a hospital gown, if you will....

Some folks have asked me to document the details when I made another dress, and I'm delighted that I finally have a day to devote to making it!   I hope this will help anyone who might be in a similar situation....

My starting point was an OOP pattern, Butterick 4607.


The main thing that drew me to this pattern was the pleats in the front of the skirt, which allows for a nice fit, given the Mumsy's very narrow shoulders & bust, & wider hips & belly.  It also has a nice neckline (w/o the collar) - comfy & just about where Mom likes it.  Everything else about the pattern got pretty dramatically altered.

Mom is quite lop-sided, with a very rounded back & forward shoulders, so a lot of adjustments were necessary to get a reasonably good fit.

For the back,  I cut the left side of the upper back and the skirt to end near the center back, & cut the right side to overlap the left by....well, by a lot....just a couple of inches short of the side seam.

These pics of the facings & bodice show the different widths of the right & left side in the back, & also give a sense of the lopsided fitting differences between her right & left sides:


It's all cut out now - more to come tomorrow when I start sewing!

Tuesday Update
The dress is finished!   I may not get pictures of the dress being worn until tomorrow, but here's the progress/process report.

Here are a couple of shots (on a dress form that is unrelated in every way to the Mumsy's body!) showing some of the dress parts:

The curve on the bodice is deceptive - this ends up being much straighter when the Mumsy is wearing it.   The skirt front is pleated, allowing for a comfortable fit with a bit of a tailored look.  The skirt back is gathered a bit.

Bodice Back.  The left side comes to the center, & the right side overlaps the left by several inches.
Showing the back in "closed" position.    I  needed to take a small dart in the overlap piece at shoulder blade level - her rounded back created a gap there.   I need to figure out how to avoid that the next time around.  

Semi-finished Dress - skirt & bodice sewn together & ready for a fitting! (hems & closures are still not done)

Back of Dress (still unfinished) - the right side overlap is folded under, just to show that the left side ends at center back all the way from neckline to hemline.

Right side of back in "closed" (i.e., just pinned at this stage) position.  The right side extends just to the shoulder seam at the neckline, & then angles down to the waist, adding several inches, which gives better coverage.   Closures will be at the neckline, mid back, and waistline.  The waistline is a tad higher than her natural waist.

The following photos come with a warning!   Please do not gasp; this was never meant to be a pretense of anything resembling couture sewing!   This is a quick & easy prototype, designed to be functional, and look good on the outside; maybe not so much on the inside. ;-)

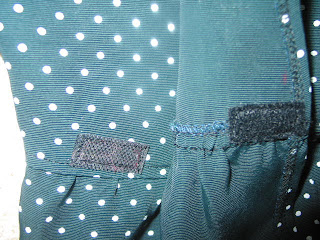
I serged the raw edges of the hems & armhole seams, & the closures are all easy-to-use Velcro.   Oh how I hate the way every little detail shows up in close up photos - sort of like those facial wrinkles that are so easy to ignore until the harsh lighting of a flash bulb!   :-o
I used Velcro Closures at the neckline,
center back, and Waistline
SA's were staystiched & pinked, armhole seam was serged.

Here's the Happy Mom in her new dress!  The front fits well, looks good:

We're discussing some trim options to liven it up a bit, and we decided that  a pocket would be a good addition for her as well (she likes to have her kleenex always at the ready!)

The skirt back is fine, but the bodice back has some issues 

I curved the edge of the right side from neckline to waistline, & ended up with some fitting issues.  First I had a gap created by the curve, so I put in a dart, which created a pucker.   Also, the top corner (at the shoulder/neck edge) just has too much going on - it's a fairly hefty fabric, & with the facing & the turned edge & the velcro, it was entirely too much bulk!


And here she is, all trimmed & pocketed & dressed up.....now I need to talk her into going somewhere!

The trim is a vintage cotton trim, snipped off from who-knows-what-or-when-or-where, found in my trim/lace stash (sometimes I love those little boxes of  treasures-not-trash that have weathered my clutter-clearing purges!)

The Mumsy always used to dress very nicely, until getting dressed & going shopping just became all too much for her.   It's really a treat for me to be able to give her something to feel fresh & new in again :)


All in all, I would call this project a success!   I still have some minor issues to work out, but I can branch out into some variations & Mom will have some clothes that both look good & work well for her needs, so everyone here is smiling!  :) :) :)

Next up:  UFO's!!!   (one down, one to go.....)

Tuesday, January 18, 2011

A UFO (UnFinishedObject)of a different sort...

Not a sewing UFO - a sewing room UFO.


A bit of history.  My little 100-yr. old country-house-in-the-city has provided me hours...many hours...of creative remodeling & decorating pleasure and angst.  During the kitchen remodel, 4 years ago, one of the most satisfying tasks was re-claiming the real estate that had been hogged by an old brick mystery chimney...completely walled over & just....taking up space in the center of the house.


The little corner of the attic room, pre-remodel

After removing the wall


Oh, was it fun picking those bricks apart!   Brick...by brick....by brick.....


 Whoa!   Don't look down there!  Two more levels of bricks to remove....


Four years later, the former guest room becomes my sewing room!   Ummm....but that corner nook still hasn't been dealt with......   I had searched for tongue & groove  wood to match what was there, but it would have to be custom made.   At great cost.  Nuh uh....not happening.....


Queenie the vintage dress form does her best at hiding the corner.    The shelving & other pieces necessary for a built in bookshelf have been gathered......
 So yesterday, at LAST!  I created the time & energy & space to get that ceiling hole patched & the bookshelf built!   I saw, & hammer, & drill, & paint....and make lots.  and lots.  of noise.   Mostly hammering.    By early afternoon today my poor darling Mum has had enough & starts turning into a crabby old lady.   Sadly, I too turn into a crabby old lady.   & pack everything up & call it quits for this session.
At least the hole in the ceiling has been (unprofessionally & incompletely) patched, & the bare redwood t&g has a couple of coats of primer!
At the moment, my lower back is actively hurting from all those odd angles trying to hammer impossibly fragile nails into impossibly solid old growth wood.   Buying a power finish nailer just moved up to the top of my Necessary Tools List.   The bookshelf project is shelved for awhile, but the next chapter will open soon!


Lessons learned:


1) Having the right tool for the job is worth its weight in gold.   Well, maybe....I'm a little too cheap to buy the $300 finish nailer I want, but I'm stalking Craigslist again!  (I promise I'm not looking at sewing machines though.....)
2) There isn't enough room in one little old house for two crabby little old ladies at the same time.   One of us could use some meditation time ;-)

Sunday, January 16, 2011

Welcoming Myself to Blogworld....

My initial inspiration for this blog comes from my sewing friends - a space to join with them and share my  journey as I re-enter the creative world of fabrics and patterns and needles...oh my! 
 
If this blogging thing gets into my bones, though, I suspect it will grow into more than that...a space for both sharing and introspection ... space to find and develop the joy I feel when I get my hands onto some new creative challenge, be it sewing, beading, papercrafting, tassel-making, home dec, gardening, woodworking, cooking, painting, finding some bizarre way to craft something new from something vintage....or blogging!

And through it all, I hope to create a heart-based space, reminding myself & any visitors to keep breathing life into the body, and into the art we create by being ourselves, finding what makes us smile, and let ourselves Be.

May we all Be... a little more aware of feeling harmony with the earth, with Spirit, with our creative muses, with each other, and within ourselves.

And remember not to take ANYTHING too danged seriously!