It's about exploring and sharing my creative adventures (mostly sewing these days) ~
~those activities that sometimes obsess, usually inspire, occasionally frustrate
~and always provide a delightful maze to wander through.

Monday, July 25, 2011

How Jilly Got Her SewJo Back (& a tour of my little sewing room)

Here's where I was for over a week:  Messed up bias seams, unruly ruffles, botched cutting jobs, unusable fabric purchases, unpicking stitches, re-tracing pattern pieces.....we've all been there, in bits & pieces, right?   (please say "yes")!  But hey, one glitch right after another, after another, after another????  My general life attitude is pretty positive, but enough was enough!   Time to take a break....


I decided that I needed to focus on projects that were either un-muckable, or easily fixable even if I did manage to muck them up.  And get my SewJo, and my Life Mojo, grounded & focused again.

Here's what I've been doing this past week:

1.  Weed Therapy!!!!   You can either pull the little buggers out with loving kindness, or with aggression...either way, the results in your garden can't help but replace a smile to your face.
I think I have a truck load ready for you, Gary.....

2.  Clutter Clearing.   Sometimes the junk yard is your best friend.   Let someone else decide if this piece of junk old object is a treasure in disguise!
Just in case you didn't think that was a truck load,
here's what's hiding behind the weed pile.....
3.  Pad the dress form.  Queenie, the lovely vintage dress form that was part of a fabulous free haul (& only took about 2 months of de-smoke therapy before I could actually bring her into the sewing room) was never going to look like me without some major adjustments.  Fabulous Fit  to the rescue!   She's still not perfect (like me - I mean....well, hopefully you know what I mean....)  but close enough to get a good idea of fit without having to contort myself while avoiding pin pricks.
Not the best shot of The Queen, but this leads into the next step......
4.  Re-organized my fabric stash, which also evolved into some re-organization of the sewing room.  FINALLY got the bookshelf built!   (It's not finished aesthetically, but it's functional)

The Sewing Room Tour:
Penelope, Colette, & Joey Janome, at your service :)

The cork board is my new Design/Project Board, ready to be filled with inspiration!

Sergio the Serger.  I kept draping pattern pieces over the doorway,
which was not the most efficient spot, & realized I had a solution already hanging on the wall :)

The new book nook is hiding behind The Queen -
it's a little slice of organizational heaven having all my books & files at my fingertips,
instead of pawing through piles!!!


I turned my cutting table so that I can drop a leaf when
I'm not actually in the middle of cutting a project out.
My tiny room can use every square inch of available floor space!
5.  Got a mani/pedi & bought a new pair of sandals to show it off!   Since I haven't had a mani/pedi for well over a year, & can't remember the last time I bought a brand new pair of shoes, this was a bit of a splurge for me.
The jury's still out on the fabric flowers,
but who knew that platform wedges could actually be COMFORTABLE!
And I LOVE the view from way up here!!!!!
6.  Clean & dust & scrub & vacuum &......all that house stuff that can get overlooked when you're engrossed in.....other stuff.   AAahhhhhhhh.......a clean house!!!!!   Another little slice of mundane heaven to enjoy!

7.  Meditate.   Daily.   At least.    Ahhhhhhh.......... :)   This is another practice that's been too infrequent lately.   Lots of justifiable reasons silly excuses, but my life sure flows a lot more smoothly when I begin my day with some focused introspection & divine inspiration :)

8.  Spend quality time with friends, who don't care if your mojo is missing....they love you anyway :) :)   Bask in that love & support.  :) :) :)

9.  And the reward... Enjoy the results!   With my sewing room (& part of the house & a little bit of the garden) all cleaned up & organized, I'm reminded of how much I love my little attic sewing space, and how much it feeds me.   Ready to play there again!   So far, the stitches are flowing easily again.....may yours be flowing & feeding you as well.....

And now, if you'll excuse me, I'm off & back up to my lovely little attic sewing room :)

Monday, July 18, 2011

Do You have Mistake-o-phobia? (Do I?)

In the last couple of weeks, I started a party dress out of a vintage sari for my favorite young woman (about to turn 21!)   The sari fabric kept giving me lots of little surprises....like little holes, ragged edges, thin bits....so I've had to treat it verrrrrry gently.   There wasn't enough good, usable fabric for the skirt, so, after much angst & eye-bleeding attempts at color matching, I finally selected a silk .... & proceeded to muck up the cutting.  Horribly.  Unusably.

I didn't really like that color anyway.

So I got a different color, pre-washed it ... & discovered a non-erasable, non-pressable crease line running down the center.   Unusable.

 Hmmmm....sure doesn't look like a dress yet, does it?
 Set that project aside.   (But her birthday is in 2 weeks!  I do need to get back to it asap.....)
~~~~~
Start working on the bias cut ruffle fabric top.  Edging the neckline & armscyes?  Nightmare stuff!   This was also going to be a gift, but, while I think I can salvage it, it will NOT be gift-worthy!   That's OK, I kind of like it on me, so it's not a total loss.  But I still don't know quite how to salvage it.... so....

 Doesn't look too bad, eh? 
Yah well, this was before I destroyed the edging with numerous failed attempts.
 I'll get there....... Set that project aside.
~~~~~
I finally found the PERFECT pattern for a wild & wonderful striped knit I have - oops, not enough fabric.   That's OK, I'll color-block it with some black knit.   Oops, still not enough fabric.


It'll look awesome!!!  If I ever get over this sew-a-phobia thing...... We'll hold off on that project.
~~~~~
Now I'm working with a fabulous silk charmeuse & yet another Decades of Style pattern (I just canNOT stay away from her designs!) & it's sloooooow sloooooooow going.   Thank heavens I whipped up a quick toile on it, because I managed to cut one of the pieces in a completely wrong size (eye-bleeding lines & all, you know.....not MY fault.....[koffkoff]).    I think I have a good fit, but there's just a ton of fiddly work involved, & I'm finding that I'm afraid of mucking this one up too, so, how do I react?

 YUMMY fabric!  Don't muck it up....don't muck it up.....
Leave it on the cutting table, & I don't  move it, because you know what happens to those fray prone charmeuse seam edges if you look at them wrong....& I forgot to add extra to the SA, so I can't lose a millimeter of fabric!  Actually, now that I think of it, I COULDN'T add any extra to the SA's, because I had those edges butted right up next to each other on the cutting table trying to get the pattern to fit on to my fabric .... once again, not QUITE enough fabric!   I swear to you right here, right now, that I am OVER these 2 yard cuts....it's too much fabric for one simple top, & not enough fabric for pretty much anything else)
~~~~~
Since I seem to have a fear of actually sewing anything, I'm (finally!!!) getting  Queenie, my vintage dress form, stuffed with the Fabulous Fit pads.    Does it look like me yet?

Uhhhh.......no.

Just WHEN, in the process of adjusting things, did I get THAT lopsided??? 
~~~~~
ETA:  Two hours after publishing this post, & I realize that it hasn't shown up on anyone's blogroll.  Apparently not only is my sewing affected, but also my blogging!   Ghosties wreaking havoc?   Maybe I should just go pull weeds......

ETA#2 - turns out it was not just my post; it appears that blogspot has been publishing posts at random, willy-nilly....posts I read in Reader yesterday are only just now showing up on my blogroll.   Is Mercury retrograde?   (make note to check)
Also, lest people think I'm being all whiney & stuff.....once you know me better you'll realize that this entire post has a tongue-in-cheek aspect to it.  I may whine, but there's always a touch of humour that goes along with it....at least in my mind & heart....I know that doesn't always translate to the written word.   


I do try to not take ANYthing too terribly seriously.   AKA Don't sweat the small stuff....& it's ALL small stuff ;-)


~~~~~
When everything seems to be going wrong, what do you do?   Walk away for awhile & wait for the stars to re-align?  Just stick with your projects do the best you can?   Pick up something super-simple that can't possibly go wrong (famous last words, eh?)   What are your secrets?

Oh!  On the good news front (I do always like to leave on a high note...) Colette, my latest Featherweight, just LOVES sewing on silk charmeuse with silk thread.  NONE of my other most-used machines do well with super-fine silk thread, but she is just thriving with it.   This delights me :)


Monday, July 11, 2011

A Pintucked Sorbetto and the Absent Summer

With the promise of an actual summer, and in a joyous fit of optimism, I made 4 sleeveless tops in the last few weeks.....I mean, I do live in 'sunny' California, but still....given last summer's weather (cold & windy), & what appears, so far, to be a repeat of last summer, what was I thinking???


I could move inland, or south, or even back to Hawaii, where the weather is always perfect.  Of course, I'd have get to sew a whole new wardrobe......

But I digress.   Here's my third Sorbetto, (Get your Free Colette Sorbetto download here!) and the lessons learned:

Sticking with my unwritten plan of learning something new with each new project, I decided to do some pintucking on this top.   After I'd cut it out.   (This would be lesson #1 - pintuck before cutting).  While waiting for the pintuck feet to arrive, I tried to figure out how to get everything to fit while pintucking post-cutting, & I ended up putting this project (along with 3 others) in the "Wait & Let It Stew Awhile" area.   (I've been doing a goodly amount of sewing, but the production level....not so goodly....)

Finally I decided to go ahead & sew the seam that creates the pleat in front, and then simply pintuck through the two layers of the pleat.....no measurement necessary!   And it worked.   So far, so good....
This pic shows the top of the pleat folded back, showing the flip side of the pintucks.
I used a perle cotton in the bobbin for the tuck filler.
I decided to use a variation of Melissa at Fehr Trade's bias edging method.
I cut my self bias strips, folded them in half & pressed, then placed a clear ruler
over the strip, lined up the folded edge, and made a fresh cut on the raw edge, so that
the whole strip was an even width.  (Yay!   Did this one right!)
Bias strip pinned in place, on the Wrong Side of fabric.
(to be flipped over, with the edging showing on the Right Side.)
This is actually where I made Mistake #2.   or maybe #3.  could be #4......  I should have
stretched the bias strip just a bit....I didn't.  I just pinned & sewed.  
Bias strip sewn on, raw edges pinked.

Bias strip folded over to RS, pressed and pinned.

Top Stitched.  Not too bad....could be better, but I am improving!

I just loved these vintage buttons from my stash on this fabric!
I only had two.   Two is a good number :)

Just for fun:  One more lesson. 
Do NOT attempt a self-portrait-in-the-mirror when the mirror is smeary!  
(I really had no idea it was this bad!   It's sort of like those little threads that don't show up until you take the picture...which, I notice now, are present in this top....)


The fit is OK, but not great...see Lessons Learned #2.

The Lessons Learned:

1.  If you're going to do some sort of embellishing that changes the size of the fabric, do it BEFORE you cut it.
2.  A not-so-drapey cotton is going to behave differently than a soft, drapey silk.  Just because you have your pattern sized right for one fabric, that doesn't mean that you shouldn't check your fit along the way when sewing it again.  ESPECIALLY when using an entirely different fabric. *sigh*
3.  I keep ending up with bias edges that are a little wave-y, or gape-y.  One of these days I'll remember to give the strip a little nudge of a tug as I'm sewing it. *sigh...again*
4.  Use glass cleaner occasionally.   Your photography just might improve.
5.  If you're going to sew for tropical weather, you might as well plan a vacation to the tropics, so that you can wear what you've sewn.   At least for a week or two.

Anyone (in the tropics) want to do a house exchange?   Must love cats.


Wednesday, July 6, 2011

Life is Too Short for ____________ AKA: Lessons I (hope I've) Learned!

1.  Irons that spit (vow:  I will never buy another Rowenta!)

2.  Cheap Fabric (I'm not talking about the nice stuff at bargain prices here, although....beware of #3....


3.  Fabric that you don't love, but couldn't pass up the bargain. (My nemesis here = garage sales - how much muslin fabric can you stash, anyway???)


4.  Books that have one piece of valuable info, but now you need another bookshelf to house them all (this is what libraries are for!)


5.  Sewing Machines that feed a growing case of SMAD* (Reminder:  Sewing Machines are large.  Buttons are small.  Collect buttons instead.  Or thimbles.  Thimbles are cute.)  p.s.  ignore the SM group shot in my previous post.  Do as I say, not as I do....Besides which, Featherweights are small.....


6.  Another Sewing Machine Cabinet.   See #5.  And #3.   (Note:  I don't CARE that Singer #42 is the most gorgeous SM cab ever made....you only need ONE.  Not three.)  :(


7.  Late-night, tired sewing.   See late night post

8.  Running back to the store to get the right color thread.   Having obscene amounts of thread is a good thing.   Collect thread, not sewing machines.


9.  Ruining a nice project with sloppy technique.   Just practice the technique first!   The time spent practicing is time, money, and sanity saved with a project you'll be happy with!


10.  Living too safe a life.  Interpret this in any way that fits :) 


I blame it all on the Spitting Rowenta.....
Examples of #5, #6, and #8


#10 :)

More #10

Can't get enough of #10!


*SMAD = Sewing Machine Acquisition Disease/Disorder

What are the "Life is Too Short" lessons you've learned?  (or are learning.....or think that maybe someday you would like to learn.....)

Tuesday, July 5, 2011

A Spa Date with your Featherweight

Colette, as she arrived...no accessories other than the jewelry she's wearing, and her little box

My love affair with Featherweights began before I even knew about it....when I was a mere childling, and my darling Mumsy was sewing nearly all of my clothes on her Feather, brought with her from England.   Fast forward, (many) years later, to my renewed interest in sewing, one basic plastic fantastic Janome, (which is still working just fine for me), but before long I was yearning for that humming,  hard-working, satin smooth finish of the vintage Singer again.... I soon had a 201, which is still definitely the workhorse in my sewing room, but oh that Featherweight....it was still calling me....  until I finally replaced the Feather of my youth!   Once....twice....a couple more......... and each one, of course, received a thorough spa treatment at my hands - I don't know who enjoys it more, me or the machine (of course they have feelings!   How can anything that adorably cute not have feelings?!)

Here, finally, is my promised record of A Day at the Spa with Colette, the latest addition to my little flock :)  You may want to check out my previous post on Cleaning a vintage Singer for additional info - a lot of the process is the same for both, but I'll try to let this post stand alone with all the info needed.


Ingredients List:

  • A large towel for a work surface (it traps all the little  screws that you do NOT want to lose!)
  • Maguiar's Scratch X - Fabulous first step to remove those fine scratches and built up grime.
  • A good Carnauba Wax
  • WD-40 - Good cleaner for the gears & moving metal bits inside the machine (more about this later)
  • Sewing Machine Oil.  
  • Rags - I like old cotton t-shirts or dishcloths.
  • Sewing Machine Lube 
  • Screw Drivers. (use the right size!)  
  • Q-tips & toothpicks
  • Brush to clean out the fluff
  • Tiny brush to oil the little screws
  • At least one little bowl - one to hold a bit of oil, others to store & label the parts you remove from the machine (and you WILL want to label everything, until you're comfortable knowing exactly where that little spring or screw goes.....)
  • Manual
  • HIGHLY recommended:  Dave McCallum's book The Featherweight and I, and his DVD "Those Fantastic Featherweights".  A bit pricey, but you can find them on sale if you're patient.  (I'll provide links at the end here)
  • Replacement parts, as needed:   - Rubber Feet, for both the machine and the foot pedal - New felt liner for the tummy cover plate (aka drip pan) - New Felt for the spool pin - a spool pin spring  (links below for ordering)
  • OXO  Brite (the way cheaper version of OxyClean) to clean up the metal bits  (this didn't make it into the pic)
And the (Picture Heavy) Fun Begins....

Step One:  Set your baby on its side & inspect the foot pads:

They probably need to be replaced - remove the foot pads with a screwdriver - they might be really stuck in there, so you may need to do some digging.

Unscrew the knob in the center of the drip pan; remove the round felt holder, the drip pan and the old felt liner.   Toss the felts - they will almost certainly by nasty & stinky!   And I've actually never had THIS much grease sitting on the pan!   Ewww factor:

WD-40 to the rescue!

The old & the new :)

Now it's time to remove all the jewelry.   DISCLAIMER!!!!!  I remove the upper tension parts, just because I really like to get in there & do a deep cleaning.  Unless you have a good set of instructions, or you photo-document every single step as you dismantle it, do NOT do this yourself!   In most cases, it really won't be necessary.  ::whew:::  sorry for yelling....just had to say that :)

In spite of the above statement, I can be lazy, so this is how I like to clean the metal bits.   Instead of spending ages trying to scrub out every little nook & cranny of all those metal bits, I just toss a spoonful of OXO into a bowl, add some boiling water, & then let all those metal bits soak for 20 minutes or so.   Do not (gonna have to yell again here....) DO NOT place anything that has any lacquer on it in the bubble bath!  Umm....go ahead, ask me how I know.... 

Here they are, enjoying their bubble bath:

20 minutes later (after a THOROUGH rinse and dry....I mean, REALLY thorough...you don't want any moisture at all left....I'll even use a hair dryer on the pieces, if there's any humidity in the air)

Colette said it was OK to show a nude pic of her (she's French, you know....)


While everything is soaking, I start the internal cleanse.   Some people caution against using WD-40, but phooey on them.  The stuff is the BEST de-greaser & de-gunker for metal parts.  Just do NOT use it as an oil substitute, wipe it off well, & follow up with real sewing machine oil.   I give a squirt of WD-40 to the bobbin case area:

...and the gears under the spool pin (see that nasty old gunky grease?)  If the underbelly area is gunky, use the WD-40 there as well.   Rub off the gunk, dry it well, & now you're ready to start oiling & greasing :) 


Now that you're done getting rid of the old, it's time to add the new.    Squeeze out a bit of motor lube & add it to the gear in the above picture, and the two gears in the belly area.   Move your handwheel, & make sure the gears are fully lubricated.  
Refer to your manual or other book & add a drop of oil to all of the necessary spots.   Just a drop!  A little goes a long ways :)

Now that the belly is fully, you can replace her undies.  Glue the new felt liner onto the drip pan (rubber cement works well), replace the pan with a fresh felt pad between the screw & the pan, & screw the new rubber feet back in place:  (BTW, I have probably a lifetime supply of red felt that showed up on my doorstep - literally - so I just make the felts myself)

And now the real fun begins!  Bring out your Scratch X (I LOVE this stuff!!!)  to give your baby the first step in its deep metal massage.   Put a small dab on your clean cotton cloth, & start gently rubbing a small area (about half of the drop-down arm).   If your machine is really dirty, it will feel like it's 'grabbing' at first, & you'll feel it start to let go & move more smoothly as it releases the gunk.   Don't let the Scratch X dry...move to a clean area of your rag & rub the Scratch X; you'll get the 'squeaky clean' reward!   For a REALLY dirty machine, you may want to repeat....I've never had to do more than 2 times.    You might want to practice on a small, hidden area at first....it's really wonderful stuff, just don't overdo it, and you'll be fine :)

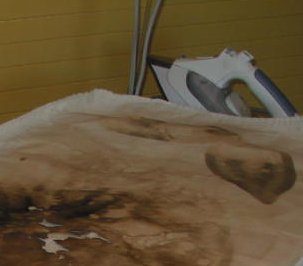
You thought this machine didn't look too bad?   Look at what came off of it!:


And here she is after her first massage!   Her beauty is starting to emerge :) :) :)

Now it's time to for phase two of the deep metal massage - the  waxing.   Use a good quality carnauba car wax, & use it just like you were waxing your fine old vintage Rolls.  Apply a thin coat, rub it in, let dry, & rub the shine on.   Repeat.    NOW she's (or he) is ready to reapply the jewels!  (The male Feathers are just as flashy & jewel-loving as the females, I've discovered.   In fact, I think my snootiest & vainest feather is a male.....)  But I digress....

When you screw the bobbin cover plate back in place, here's a common mistake a lot of folks make - see the little finger that's sticking up at 12:00?   That's where it needs to be, right in the groove at the bottom of the cover plate.   Make sure it's in this position before screwing the plate back:

I actually like to do another full waxing massage after all the chrome & metal bits are back - I even wax the face plate & throat plate & some of the other chrome bits.   And then a stitch test.......Yes!!!   Perfect stitches!!!!!   (how rewarding is THAT, after all your hard work!?)  :D :D :D

And who's a pretty girl?  


Let's give her a flower!

I like to cut my oil-catching protector cloth long enough to protect the bed from the face plate screw before putting the baby to bed:

Of course, everyone else had to come out to meet the new addition!  They agreed to a photo shoot, so...just for fun, here's my mini-flock:
Clockwise, from the top:  Raggy G (1941), the victim of an eBay idiot who thought a sheet of newspaper in a huge cardboard box was adequate shipping protection (RG is now my gracious donor guy).  Stirling (1954), the fabulous (& he knows it) 222, Maxine (1951), the Centennial party girl, Sophia (1947), the elegant beauty who emerged from rough beginnings, and Colette (1952).


Helpful Links:
And....last, but most decidedly not least.... I have to give a MAJOR shout out for the blogless Lynn Rowe, Pattern Review's resident Featherweight Goddess, who has researched & deep metal massaged her feather-lovin' little fingers to the bone, gathering and sharing knowledge & information for the rest of us :)

*whew*  This took way longer than I anticipated, but those darlin' little feathers are worth every second of time you give them!    

Please, share your Feather stories with me -   I love hearing them!