It's about exploring and sharing my creative adventures (mostly sewing these days) ~
~those activities that sometimes obsess, usually inspire, occasionally frustrate
~and always provide a delightful maze to wander through.

Sunday, October 30, 2011

I Said "Yes" :) (to the Peony Vest)

We had to take a little break for awhile...sometimes relationships are like that, you know?  "It's me, not you" I told the Peony, and this was true.  After some required R&R, I feel centered & ready to enter the relationship arena (aka sewing room) again, and we're getting along better than ever!

I suppose this step was the equivalent of a ring - a nice little bound buttonhole* (my first! at least in memory....I may have done some in my previous sewing life, but I don't remember ever being successful....).    Once the leather had been cut, there was no going back, and even though I've known I wanted to commit for some time, this pretty well sealed the deal :)
*CORRECTION!  sdBev asked if this buttonhole was going to have lips, and I realized this is NOT a bound buttonhole; since it doesn't have the inside lips...I'm still searching for what the formal name (if there is one) of this sort of buttonhole is - anyone?  
UPDATE:  gloria suggested Spanish Snap buttonhole (which looks like a pretty cool technique), and Lynne concurs, so I'll go along with that.  Although, since it seems to be a variation of the Spanish Snap, I think I'll just call it the  "Koos Buttonhole" :)

I bought Koos Van den Akker's Vogue 1213 (aka the Stegosaurus Coat) after seeing sham's version, along with her recommendation to get the pattern for the buttonholes, if nothing else.   She was right!  I LOVE his buttonholes!   Well, I love a lot of what he does, but that's another post.   So I borrowed his buttonhole idea, with a few alterations, and I'll be using it again!  And again, I'm sure!

Here's the simplified process (not really a tutorial, just a brief explanation):
Cut a square (or circle, or whatever) of fabric & lining, & sew RS together along the edges, leaving an opening to turn.   Turn, slipstitch the opening, & baste along your buttonhole edges to mark the placement.  Baste two "v's", which will be folded & stitched later.   And there's lots of room for other creative folding & stitching options once you have this figured out!  Too much fun!
Place the buttonhole piece, RS against the inside of your garment.
Stitch along the basted buttonhole edges.
Slice the center of the buttonhole; cut v's at each end, (as you would do in any welt opening)
and pull the buttonhole fabric through to the RS of the garment.
Fabric pulled through.  
After this, you fold along the basted lines that form the v's,
& topstitch along the foldline, the outside edges, and the buttonhole.
Done!
I also (finally!) made a decision about the spaghetti tube.   Here's the front:
The end of the tubing, towards the top, isn't sewn down yet,
but I think it will extend into the gold fabric, kind of as shown.
I added some pigskin strips to the back side panels, echoing the lines of the strips on the front side panels.  The only embellishment left now is to add some more of the spaghetti tubing onto the back piece.  I'm planning on just adding some simple, curvy lines, as on the front piece.

All that's left after that is sewing up the sides,  finalizing the hem placement, and  sewing up the lining seams (some, if not most, of that will be done by hand).

Oh, and the button.  I have a cool button :)

I hope you all are taking the time to keep yourselves healthy and happy, in order to keep your relationships happy and healthy :)

Here's to Joy, Abundance, and Well Being.......

Thursday, October 20, 2011

Coming Together (Peony Vest)

It's my birthday and I'll sew if I want to
Sew if I want to
Sew if I want to...

If you got the musical reference, that means you're probably as old as I am ;-D
I was even wearing my hair in a Lesley Gore-type flip back then!
(Note:  this is Lesley - not me!  I was cuter)
:::looks at ceiling, whistles:::
I'm spending the day sewing as much as I can, and plan to breathe in blessings with every breath I take, and breathe out a smile of gratitude - if I can remember to do that all day, then I could not possibly hope for a better day :)

And the peony vest is cooperating!  :)  (mostly) We've been getting along famously well, with a bit of back-tracking here & there, but I'm carrying on, slowly, and calmly, with plenty of forgiveness for any mistakes made....it's amazing what a difference a patient attitude can make in forging a solid relationship.  ;-)

Diane Ericson's instructions continues to create some confusion, and I've found that the best solution is to read them through & figure them out as best I can....then muddle through in my own way.    One thing to be aware of is that she bounces forward & backward with construction steps.   A couple of examples:

The instructions to pull the lining piece out of the way of the pocket comes in the step AFTER she has you start to sew the pocket on.
Instructions about sewing the lining on to the side pieces come in the step AFTER you sew the side piece on to the front piece.
The illustrations sometimes show pieces sewn together; sometimes they're separate....even though they might already be sewn together.

I unpicked one entire seam just because I had blithely sewn it up while trying to figure out just how the lining was supposed to work......and then realized I had meant to install piping in that seam.   My bad, but the confusion about the construction process led me astray.  A more experienced sewist than I probably would have been able to envision everything at the beginning.  Even though the construction bones are really close to being done on my vest, I'm STILL figuring out the details of what to do when!

One thing I've learned is that I have a LOT to learn about linings!  How to choose the best fabric match, how & when to install it, remembering to stay stitch fray-prone bits (especially when it gets handled and fussed over as much as I tend to do!)

However, I've definitely improved my piping installation technique.  Here's how I'm doing it at this stage:

Add a strip of Steam-A-Seam to the edge of the leather,
lay the piping on top, measuring the stitch line (5/8" in this case)
I didn't want to run the piping over the shoulder seam,
so I cut  it just before the seam, pulled out a bit of the cord & snipped it off.
Pulled the piping over to the edge,
so that it will be sewn into the seam.  
The piping on the left (between the gold fabric & the pigskin) shows the resulting look.
After laying the abutting fabric on top of the piping,
I sewed close to the piping with a zipper foot.
(I don't have a cording foot....I'll look into that)
The unpicker is only in the shot to show how I'm sewing

with the zipper foot as close as possible to the piping. 
Where we're at right now
I'm very happy with the way everything's coming together.....wish me luck at keeping it going!  And I hope your relationships are sailing smoothly as well...

Slow and steady......

Tuesday, October 18, 2011

Relationship Time Out - to accept an Award!


The amazing Lynne, of Sewing Cafe, has named my blog to receive The Versatile Blogger award!  How delightful is that?!  (and what a nice break from all this relationship business!) ;-D


I still remember when I first discovered Lynne's blog, as she was working on gloves for a Batman costume.  I was so impressed with her detailed work, & couldn't wait to see the finished product.  Here's her post on The Cape, and she now even has patterns for Batman and Robin costumes.   As a former costume-maker in the movie industry, her work holds high standards, and I am honored to be recognized by her.  ::blush::  Thank you Lynne!


The award comes with a few obligations, as follows:

  • Thank the person who gave you the award and link back to them in your post.
  • Share seven things about yourself on your blog.
  • Pass this award along to recently discovered blogs.

Seven things?  Gosh, I dunno......  I've managed to keep my private life sort of kind of private here, but things just start leaking out anyway, so here goes:


1.  This won't be news to many of you, but I've curtailed work a lot recently in order to be my Mother's (who is 96!) caregiver.  She not only taught me to sew when I was a kidlet, but being home so much now (I moved her in with me), combined with the need to alter and adapt her clothes for her changing needs, was the major impetus for finding my way (so happily!) back into the sewing world in January of last year.


2.  When I do work, it is one of two businesses. My passion is my Feng Shui/Space Clearing practitioner work - a journey that has changed my life.  BE-ing aware of how we interact with our environment, and each other, is a daily life practice for me, and has given me a sense of heart-based non-judgment that affects everything I do, whether consciously or subconsciously.   Not that I don't ever get lost in chaotic confusion & other majorly challenging emotional states - hey, I AM human!  ;-D  I just try to remember that I have the tools  to find my way back "home" :)  And a lot of amazing, healing, friends :)


3.  Some form of a creative outlet has always been a part of my life - from building fantasy communities out of popsicle sticks and plastic horses as a child, through playing various musical instruments (flute, bassoon, piano, guitar, piccolo) throughout school, to dance, jewelry-making, home & garden design, flower arranging, pendulum-making....and of course, sewing!

4.  I was an avid sea kayaker for many years, and spent a lot of time as a volunteer for a wonderful local organization, Environmental Traveling Companions, providing outdoor adventures for people with special needs.  I still own two boats, but I seriously should sell them, because they haven't gotten salty for several years now.  But then again, I keep hoping.....

5.  I lived my life sort of backwards in some ways.  I decided I wanted to travel, hike, & live a semi-retired life while I was in my 20's & had the vitality to do a lot of crazy things.  I lived on a shoestring much of the time, & figured I would do the career thing later.   It seemed like a good idea at the time..... ;D    While I would do many things differently "if I knew then what I know now....", I don't regret any of my experiences.   They have made me who I am.  :)

6.  I was a dog person most of my life, and didn't understand cats.   At all.   Until I lived with one for several years.   It took several years of those several years before I realized that cats were people too, and now I live with (and love) three of them.  =^oo^=  >^..^<  =^--^=


7.  I love to dig in the dirt and grow things.   Especially flowers.  My little urban garden is filled with fruit trees, dahlias, irises, tulips, poppies, passion flowers, roses, callas & various other lilies, mums, etc. etc. etc.    And lots of California native, drought-tolerant plants.   Everything is planted & watered with an awareness of environmental responsibility, which is another of my passions.


*whew*  enough, already, about me!

I've discovered several new (or new-to-me) blogs recently, and I'm delighted to share them here!  (actually, sharing other blogs gives me much more pleasure than sharing info about myself)

Margy at afool4fabric. represents the sewist I want to look like when I grow up!   It will never happen, because I just don't have the elegant beauty and classic bones that exude from her, but I am definitely inspired by her style!   She's a fairly new blogger, but a very experienced seamstress, and she has a fabulous ability to mix creative quirkiness with classic elegance.   Meeting her in person at the recent Artistry in Fashion event was a total delight!

I'm finding puu's door of time to be a wonderful place to hang out.  Her blog has been around for awhile, but is new to me.  She is funny, talented, and inspirational in the way she takes (mostly) vintage patterns and creates very modern pieces.   Her styling is unique-in-the-world; her pictures are always fun to look at, and she has some great educational posts as well :)


Another new(ish) blog belongs to Dixie, at With Needle and Brush.  Dixie's creative eye, and ability to instill magic on fabric with embellishments, is the best sort of eye candy!  I have a fantasy of spending time in her studio and soaking up tips and techniques from her (and wandering around Sawyer Brook Fabrics with her too, which is where she works - what a job, eh?)


I hope you visit these inspiring blogs & enjoy them as much as I have :) 

The Peony and I - Our First Fight (We need Help!)

Well, maybe more like a misunderstanding; hopefully just a little bump in the road.  We've both agreed to counseling, so any professional help (or unprofessional, or even totally from left field suggestions) are welcomed here.  I'm afraid I'm going to have to accept full responsibility for this mishap :(.

I clipped the seam allowances from the interfacing on the pigskin, to reduce bulk - in retrospect, this may have been my first mistake (more on this later....you don't always see it coming with your first innocent misstep.....).

Actually, yesterday was "one of those days" from the get-go.  My cat had a last minute vet visit (we're awaiting biopsy results) and I didn't get the cording for the piping until late afternoon, so the daytime sewing I was hoping for didn't happen.   Making the piping, though, went smoothly.
I basted it on to the leather, using a zipper foot.  (Note:  sewing the seams - leather to leather - was a breeze with a walking foot)  It was dragging a bit in places; my low-tech solution was to place some tissue paper from an old and never-to-be-used pattern.

Piping basted in place.  So far, so good:

Next step, add the lining.  Uh oh.  This is where the problems started.  Again, I was using the zipper foot, to get close to the piping seam.  I mentioned in an earlier post that I had interfaced the leather because is was pretty stretchy.   Pigskin, apparently, does have a grainline.....sort of.... and I tried to cut accordingly, with the maximum stretch on the crossgrain.  As I was sewing the leather, piping, and lining, the skin was puckering in some areas, stretching in others, and creating a totally wonked out match with the lining.   Did I mention that the lining is silk?  A relatively thin silk?   Probably something like a thin habotai?  With no stretch at all?

Now, I've done this before - tried to marry a lining with minimal stretch to a fashion fabric with lots of stretch.  I made it work (because that's what I do, whenever possible), but I swore I wouldn't try that again.

Whoops.

I thought I had taken care of the leather stretch with the interfacing.   Nope.  Especially not (I think) when I removed the SA from the interfacing.   Here's what's happening at the bottom edge:
The rounded flap is designed to fold over.
Nothing is pressed, but even a good pressing won't solve the problem here

And here's the problem:  the bottom edge.
See how the leather is folded over the lining?
I've already unpicked everything along that bottom edge once,
 shortened the leather piece, & resewed, but it wasn't enough.

Here's a better look at how the leather is folded over the lining,
and see how MUCH lining fabric is extending out?
These pieces matched when I started!
Note that I had already removed the piping from the lower edge of the other side front - and I haven't sewn the lining to the leather on that edge.   So the problem here is that I have pieces that are designed to have the leather & the lining sewn together on all sides, but the leather & the fabric don't want to match up.  And I'm afraid the leather might continue to stretch.

Soooooo...... do I just undo the lining from the leather at the bottom edge & finish them separately?  In which case, how do I ensure that the area of the lining that shows on the folded over flap stays smooth & nice-looking over time?   Do I unpick this lining & use a more suitable fabric?   Frankly, the main reason I chose this lining was the color match - these were all fabrics from my stash, & it just didn't even occur to me that leather & silk weren't going to play well with each other (picture me rolling my eyes, and really truly swearing to remember this lesson!!!!).    I am willing to unpick everything & change out the lining if that's what it takes.  I can be tenacious that way.

I still think this relationship has good possibilities - the attraction is, shall we say, a strong one.  ;-)  And I'm willing to take responsibility for my lack of forethought - going for looks over practicality, as it were - and make some changes.  We're open to all suggestions!

Oh, & btw, while I was buying the cording I found the perfect button, and I have what I think is a fabulous idea for the buttonhole brewing in my brain.    I do have hopes.  :)

I'll leave you with the 'diamond in the rough' shot I took after laying out the cut pieces:

I hope your relationships are all moving along smoothly :)

***UPDATE***
Lynne was SO spot on with her analysis (in comments below).   Here's a shot of the rounded front lining piece after I unpicked it, & laid it on the pattern piece:
The curve on top, & the extra bit at the point, match the wonky bits after it was sewn on....go figure, eh?    A new piece has been cut & sewn on, (using Steam-a-seam lite) & we seem to be back on track :) :) :)  Thanks Lynne!!!

Sunday, October 16, 2011

Growing the Relationship (Peony Vest)

I'm getting to know more about my new friend, and it's going well so far....lots to learn, but going well :)


Some General Pattern Notes ~ 

 If you look at the envelope renderings, you can see that the rounded front is on the left side of the top, the right side of the vest.  The pocket (should you choose to have one) is attached to the rounded front piece, so lay out & cut according to where you want the pocket.  I'm right-handed, so I wanted it on the right side.  There is no mention of this in the instructions.  Actually, there are a LOT of construction details that aren't mentioned in the instructions, but they are LOADED with creative ideas, suggestions, & helpful hints in the artistic/design end of things.

So, if you want your hand held with fitting & construction details, Diane's patterns are probably not a good fit for you.  If, however, you like the jump off a diving board into a lake full of unknown & fabulous possibilities, Diane's patterns just might be the perfect platform for you!

Some notes about the fitting process ~

I cut out a straight size Small, but made quite few alterations right off the bat, before sewing up the first (of two) muslins:
  • Forward shoulder & sloping shoulder (usual adjustments for me, but I ended up doing both of these adjustments even more extremely on the second muslin)
  • Some darts in the front side pieces, and nipping the waist in, for a bit more shaping.  (Note:  the description says "The top and vest are easily fitted with bust darts included in the front seamlines."  Since there is no further mention of bust darts anywhere in the pattern, I guess she means that YOU can include bust darts if you want to.   Which I did do.)
  • Much shorter.  3-5" shorter.   Each of the pieces, back, side backs, side fronts, & 2 fronts, have creative room for varying the lengths & hem shapes - I made them all shorter, and played around with the hemline shapes a bit too.
  • Cut the armscyes in by quite a bit, & rounded the top of the outer shoulder piece, to avoid the Gladiator Look.
  • Rounded off the neckline of the side with the point.
  • Made the pocket a bit smaller, in order to fit the shortened piece.


The Piping Process:

The first step was cutting out yards of bias strips from my silk charmeuse.  Diane includes instructions on making continuous strip bias - I've been wanting to do this, so I tried her instructions.   The slippery nature of the charmeuse presented some challenges, but I'm OK with what I ended up with; I'm sure it would be much easier with a more stable fabric.  These pictures show what I did, but since they're the only pics I took, it's not designed to be a detailed tutorial.  That said, my hint about using a smaller cutting mat may be helpful to some of you :)
Cut a rectangle of fabric, and fold the opposite corners over to meet in the middle.
Sew this seam up (RS together), creating a tube.  Note:  Since each end of this seam has one corner end of the fabric, and one straight edge, the seam end isn't a clean ending.   I didn't worry about it...the triangular ends of your fabric end up as scrap pieces anyway.  (Which the frugal me, of course, saves for future use!)
Diane's instructions say to use scissors, & basically, just keep cutting a strip of fabric, flipping your tube over & over. If I tried doing it this way, I would have ended up with a ridiculously wavy, uneven, strip of fabric that would need to be cut again in order to even it out!

I wanted to use rotary cutters and an edger, in order to get some semblance of an even strip.  Since you're only cutting one layer of fabric, but a tube automatically gives you two layers, my solution was to insert a small cutting mat inside the tube.   This way, I could use the rotary cutter, and I just kept adjusting the tube of fabric by setting the cut strip to the side, and rotating the tube to the top of the cutting mat, evening up the cut edge, placing a clear straight edge over the fabric, and cutting the next bit.   Hope that makes sense.

Here's where I'm at with the Piping Process, so far:


The 2 left samples are the seams between the pigskin & the silk/cotton.  On the left is a sample with unfilled bias strip.  The seam allowance is pressed to one side (the silk/cotton side) & topstitched.

The center is filled piping (filled with a nylon cording...I need to get some proper cotton welt/filler cord - any suggestions about brands, suppliers [JoAnn's, which is close to me...?], etc?)

What I know I'll do with these is:

  • Remove the interfacing from the SA on the pigskin.
  • Press the SA to the silk/cotton side.
  • Grade the SA
What I think I want to do is get some proper filler for the piping & use the filled piping option, even though it makes for a bulkier seam, but I'm open to suggestions/opinions from any of y'all....?


The right side sample shows filled piping on the edge of the pigskin.  I understitched this, & graded the SA.  I like this option for the front edges & neckline; don't know yet if I'll carry this through to the bottom hem.  I could topstitch this edge as well, but I think I'll wait to decide on that.

I'm definitely committed to this relationship; I still think it has great possibilities, and I'm determined to do all I can to not muck it up!   So far, my date is being very cooperative; that's always a good sign!  :)

Any relationship advice is welcome......

Oh, btw, here is a link to some inspiration pieces from Diane's website - enjoy!

Starting a New Relationship (ReVisions Peony Vest)

This pattern has been winking at me from my stash for well over a year now, and finally, I winked back.  Actually, we're officially dating now.  I've been sewing a number of fairly ordinary pieces lately, and my creative juices were longing to come out & play, and Diane Ericson's ReVisions Peony Vest seemed like just the right playmate.  My play time in the sewing room has been rather limited lately (hence the lack of blogging, if anyone noticed), so a relatively simple vest, with a lot of room for creativity, seemed just the ticket!

This pattern only has a few reviews over at Pattern Review, & some were rather negative, but I was finding pictures of finished pieces elsewhere on the web that looked absotively inspiring!   And each one completely different from every other one!   I was seeing a LOT of room for playfulness.

After pulling a few fabrics that I thought I wanted, and going "nope....not this one....nor that one....nope...." all of a sudden the right combo practically jumped right on my cutting table.   A supple, salmon-colored pigskin & a yummy golden silk/cotton looked like a perfect pairing.   A rich, coppery silk for the lining.  And what's this?  A fruity, flowery silk charmeuse - one of the very few fabrics that somehow made it through all of my purges from my previous sewing life....this piece has to be over 20 years old!   Perfect.


I LOVE every one of these fabrics, & knew that there was going to be a lot of playing around with placement, & not a lot of room for mistakes & unpicking, so a muslin was definitely in order.

Did I say relatively simple?

Two (2) muslins later, I was finally ready to cut into my fashion fabric.

Two (2) more FULL evenings of laying out pattern pieces & cutting later, and I still haven't stitched a stitch!  Well...I did do a test piece, which only brought up more how-to-do-this questions....but still, every good, lasting relationship takes a little work, and I AM having fun!  Really, I am.

A total of 18 pattern pieces, plus a few yards of bias cutting (on slippery silk charmeuse, no less), with little tweaks & added darts & fitting alterations and....oh, yeah, doing it all late at night..... this may take awhile, so it's going to be one of those multiple blog posts items.

Lining, Side Pieces, yards of bias, & pigskin
That picture makes everything look so....non complex.   That took me two full evenings???   In my defense, I have learned to go uber-slowly when I'm sewing late at night.   We all know what can happen when you're tired and you start rushing....

And I interfaced the pigskin - it was so stretchy that I felt it needed some stability.   It's times like that when I think one of those large pressers might just be a good investment!   Also, this was the first time I tried making a continuous bias strip....maybe, now that I've done it once, it will actually save time the next time, but trying to figure out how to best do it (remember...late night sewing....) took for-friggin'-ever!

I did play around with a test piece - piping in the seams.   I will be doing this; but I'm not sure about the details yet:

All in all, I do believe there's hope for this relationship.  I really think I can make it work :)

How are your sewing relationships going for you these days?   Do you prefer the one-night stands?  Or do you savor the long-term ones, with their inherent ups and downs?


Monday, October 3, 2011

What's with all of the Malware Warnings?

Is it just me?   For over a week now, every time I click on certain blogs, I get a warning sign that says "WARNING!  Something's not right here... ***.blogspot.com contains content from hungryzombiecouture dot blogspot dot com, a site  known to distribute malware" I just clicked on a new post from one of these sites, and the malware warning also points to adventuresindressmaking dot com as a malware carrier.

It doesn't matter if I click from my Dashboard, from Google Reader, or from my blogroll, I get this message.

I haven't been keeping track of the sites this happened on, but today it happened when I clicked on  Stepalica and Lucky Sew and Sew's blogs.   I don't want to continue to their site & get their email addresses, so I can't send messages & ask them if they know what's happening.

I have never had a virus issue since I switched to a Mac, so I'm not too concerned for myself, (hope I don't need to be!), but I am concerned for the folks who might be infected.....   Is anyone else getting these messages?  Is there anything that I, or we, should be doing about this?

Thanks for any advice.....

ETA:  A response (I don't think it's directly from Google, but from someone who appears to know what's going on) over at the Google help center:


"There is a widespread issue occurring with Blogger currently.  What happened is there is a 3rd party utility from blogutils . net that is used on many Blogger sites  and  blogutils . net  got hacked and the utilty started returning malicious code.  Just about every Blogger site using that utility got flagged.   blogutils . net  has cleaned up the hack and the utility is no longer returning malicious code, but any Blogger site which got flagged by Google will continue to show the warning until a malware review is done by Google and the site is cleared."


ETA.1:  Shannon at hungryzombiecouture.blogspot.com is now malware free!   (See comment #31 below).   Hope the rest of the infected are able to clean things up as well :)

Saturday, October 1, 2011

Style Arc - Linda Stretch Pants (at LAST!)

Did you see the movie "The Sisterhood of the Traveling Pants?  It was a story of four girls, with four completely different body shapes, and one pair of magical pants that fit each girl perfectly.  With all of the reviews of these pants coming from women with utterly diverse body types, and pretty much unanimous rave reviews about the fit, I can't help but wonder if there's something magical going on...

So of course, in continuation of my Style Arc binge, I simply HAD to include this pattern, in the hopes that it would fit me as well as it does everyone else.


The suggested fabric (and enclosed fabric sample) is for a stretch bengaline, which is a woven fabric with just a small amount of 2-way (not 4-way) stretch.  It is apparently easily available in Australia, but not so much in the U.S. (at least in good quality), so us poor non-Aussies have to make do....  I had a mystery fabric that was a nearly perfect match for the sample, albeit a bit thinner & with more drape.   Sadly, my (nearly nonexistent) fabric cataloguing methods left me totally clueless about what this fabric was :::eyeroll:::  Especially since it really is a great fabric for these pants!

I swear I'm going to change my ways.   Definitely.  With my next fabric purchase.   For sure.

The first thing I did was compare the pattern (size 10, in my case) against my best-fitting pair of RTW stretch pants.  The most notable difference was that the Linda pants had a much wider back piece, and a longer crotch curve in the back.   Was this the magical fit secret?  The overall sizing appeared to be good for me, so I carried on, & cut them out exactly per the pattern, except for the length...

Note on the length:  I'm 5'4" (almost) & my legs are proportionately short, so I chopped off almost 3" from the length.  (they allow for a 2" hem)  I did not allow for how much fabric would be taken up by my *ahem* thighs, so I ended up with less than an inch for hemming - I'll leave more next time!  (Yes, there will be a next time)   I would say the length allows for a 5'5"-5'6" person; if you're taller, or have long legs, definitely add more!

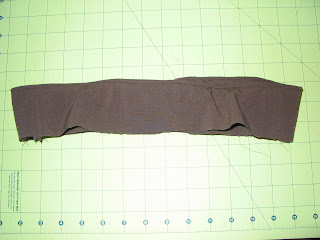
There are 3 pattern pieces:  Front, back, & a folded waistband that is the same for front & back.  There's a nice little tip about the recommended stitching sequence in order to "improve the crotch shape".   (Sew the inside legs together, then the crotch seam - back to front, then the outside leg seams)  I'll believe their method, because something sure seems to work!

They do say to use a "stretch thread" - I'm pretty sure what this means is a "stretch stitch".   I used the zig-zag lightning stitch on all of the leg seams, and a long stitch, followed by serging, on the waistband.

The waistband calls for adding 2" wide elastic (optional).   Given the stretch of the fabric, you could possibly get away without using any elastic - I considered this, but ended up using 1-1/4" elastic.   Partly because I didn't really want elastic THAT wide; partly because that's what I had...you know how it is....

I stitched it into the top fold of the waistband, like so:
1.25" elastic & folded waistband

elastic placed near the fold

elastic stretched & pinned in place 

Stitched along the top fold
I then basted the waistband in place, to check the fit - pretty darn good already!  The waist sat a little high on me, but then my waist to crotch ratio is on the short side as well.   So I trimmed 1/2" off the back of the pants, tapering to 1/4" in front.

These pants could easily be a quick evening project, start to finish, but of course, if you follow my sewing progress, you know by now that I'm going to find something to do to make it a little more challenging....

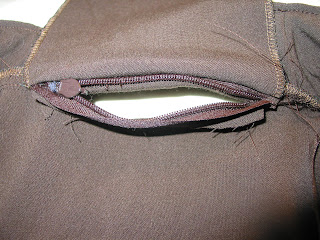
In this case, the RTW pants I was comparing these to had a little hidden zippered pocket at the waistband, and I decided that would be a fun addition.   Which is why, instead of finishing these in one evening, they took 3.    The fuzzy brain that goes along with late night sewing was a contributing factor in taking so long to figure out the logistics, but I did end up with a workable pocket.  Finally!

If anyone wants to tackle it, (or improve on it - please do let me know if you find a better way of making a pocket like this work) here's what I did (apologies for the fuzzy photos):

  • I used a C&C invisible zipper (it's what was available on short notice - next time I'll find a sport zip w/ lighter, smaller hardware; this was too bulky!
  • I cut a length about 4.5" - too short by the time I secured the end & had it sewn in.  5.5" minimum next time!
  • Sew the waistband on with a long stitch (to be serged later) & leave an opening for the zip.
  • Sew one side of the zip to the waistband, the other to the pants top


  • Cut one piece of fabric for your pocket - I serged the edges
  • Sew the top of the pocket to the waistband seam and the zipper tape, so that your seam is made with the following layers:  the 2 raw edges of the waistband, the zipper tape, and the pocket top

Pocket laid in place

Pocket flipped up
  • Serge the waistband to the pants, making sure you don't catch the lower zipper tape in the stitching.   It got tricky around the zipper pull (note the blank, unserged area), but I figured this would all be nice & secure when I topstitched the SA in place.
  • Note:  I really should have used a wider serge stitch -  it wouldn't have helped my issues of getting around the zipper pull, but it would have helped with the topstitching!
  • Clearly, I need to learn more zipper techniques to avoid this issue in the future!


Finished Zipper, open....

And Closed.
Next, I just sewed the pocket in place around the edges - you can see the stitching on the outside, but it's pretty subtle with a good thread match.  There is a bump where the zipper pull hardware is; I want to check out some other zipper brands, since I think this whole technique could work well once I get it figured out.   I would also place it a little more towards the center, so that the zip pull doesn't sit right  above my hip bone.

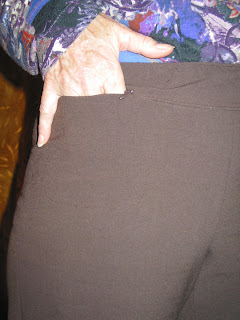
The 3-finger pocket.
I don't think any pickpockets are going to pull a fast one on me with these pants!  ;D
I would definitely want to add an inch in width, but still, the pocket is big enough for a key & a credit card, or even a cell phone :)
And....ta Dah!   The finished product:


This is not how I would normally wear pants like this, (shirt tucked into stretch pants = not such a great look) but I wanted to show the fit details, and it's not like anyone but my closest web friends will ever see this picture, right?

Bottom Line?  The Sisterhood of the Traveling Linda Pants has been carried on!  I'm very happy with the fit overall.   (My tummy is a different matter, & it isn't even Thanksgiving yet....rats....But that's what stretch pants are for, right?)  I'm not really sure how I can improve on this fit - if anyone sees any solution to the existing wrinkles, do let me know, but overall, they're super comfy & I WILL be making more!  I'll definitely cut them a bit longer, & will try them in a slightly heavier fabric.    And I won't bother with the pocket in all of them, although I do like my pockets.....

I think it may be time for a bit of Style Arc break for awhile.

That is, unless my Jilly Jeans arrive tomorrow.   I mean, JILLY Jeans?   What choice do I have, really? I know they weren't really named after me, unlike the shaza pants, which really WERE named after our very own shams.

Which makes me wonder, has anything ever been named after you?   Any interesting stories out there about your namesakes?