It's about exploring and sharing my creative adventures (mostly sewing these days) ~
~those activities that sometimes obsess, usually inspire, occasionally frustrate
~and always provide a delightful maze to wander through.

Friday, July 27, 2012

Meet Some Blogger Buddies at Canada College!


For any local bloggers out there who have not yet heard of this event, I'm spreading the word..... Canada College is hosting its first Blogger Meet-up -for Sewing, Fashion, and Crafts Bloggers - on Monday, August 13 from 7:00-9:00 pm in building 3, room 255.  Canada College is located at 4200 Farm Hill Blvd., in Redwood City. (that would be California...)


Canada College is where the FABulous Artistry in Fashion event is held in the Fall.  My first time there was last year (blogged about here).   The minute I had this year's date confirmed, (September 29) it went on my calendar, and will for every year to come as long as I can still walk and appreciate artistic fashion :)

In the meantime, this blogger meetup sounds like a fun event!   I'll be seeing other sewing buddies I know there, and hope to meet some new buds as well :)

Special guests will include Wayne Wichern, local milliner http://www.waynewichernmillinery.com/ and Lynda Maynard, author of The Dressmaker's Handbook of Couture Sewing Techniques: Essential Step-by-Step Techniques for Professional Results http://www.amazon.com/Lynda-Maynard/e/B00406098S.

Please RSVP to Ronda Chaney, Department Chair at (650) 306-3370   or chaney@smccd.edu by August 6, 2012.


Ronda suggests that you bring some of your work to share  - who among us doesn't enjoy doing that? ;-)  Rumour has it that the food will be plentiful, and there will even be  gifts for all!


Hope to see you there. :)


Thursday, July 26, 2012

One Good Habit (Begets Another?)

Here's a small post, with a small promise....

Sarai at Collette wrote an inspirational little post about replacing bad sewing practices with good ones. Timely for me, since I've been hyper aware of all those hanging threads...you know, the ones you don't see until they show up (by shouting out "LOOK AT MEEEEE!") in the finished pictures you take.

The gist of the practice is a Zen-ish one - making one small change at a time, and not getting overwhelmed by something so all-encompassing that you set yourself up for a fail.

So this is a simple little promise to all of you, written out loud, that I will snip every thread as I create it during the month of August.  This means both at the machine and hand sewing.  It's not like I have a lack of scissors - I have at LEAST 4 thread snippers that are in constant use.


I will do my best to have thread snippers handy at every step where they might be needed...and USE them!

How about you?   Any small change you want to share that might help you be a more conscientious sewist?

Saturday, July 21, 2012

It's All About The Shoes....

And short legs.
And vanity.
And fat knees (my Mother had gorgeous gams...I inherited my Father's.   What's up with that???)
And price.
And quality.
And above all - COMFORT!

Shoes, unedited.
Hmmm...Shoe Storage could be another topic.
Remind me to bring out the shoe polish next time I'm watching TV w/ nothing else to to.....

I think I've hit an "Aha!" moment with my last post, wherein I realized that part of the reason I don't wear dresses is the vanity issue.  I dressed primarily for comfort for years.  Years, I tell you.  I could clean up very nicely when I had a situation I needed to "dress" for, but that nearly always involved a silk top and nice pants of some sort - and it's easy to pair shoes with pants.  Some dresses really ARE comfortable, so it's got to boil down to the vanity thing.   For all those years of dressing "comfortably" (aka...non-fashionably, even sloppy/frumpy a good deal of the time!), who knew how much vanity I was hiding behind?  Ah.....field day for Freud time......

Anyway, Freud aside....pairing shoes with a shorter (i.e., knee-lengthish) skirt, when you have short legs and don't wear high heels and want to look non-frumpy and still be comfortable = not so easy!

So help me out here, please!  This is what I've figured out:  

  • Shoes with ankle straps, or straps of any sort, really, shorten the legs even more.   Especially when the color is a major contrast to the legs.
  • With some exceptions, I top out at about a 2" heel in comfort level.  Platforms, if stable (and, of course, comfortable) are OK.
  • I don't like pointy toes.  At all.
  • For some reason, shoes that make my feet look small (I'm average size - 8.5/38-39) look unbalanced to me - I actually prefer a wider toe, both for comfort and for looks.
  • I love boots.  LOVE boots.  Cowboy boots, wintery boots, tall boots, mid-calf boots...love 'em!   Love 'em with pants, love 'em with long skirts, and if I start wearing shorter skirts & dresses, I think I'll love 'em with tights.  But you just can't wear boots in summer.   It's summer shoes that are my head-scratcher here.
  • Sandals/flats with dresses & skirts = more leg-choppers.
Am I wrong about any of those points?

Random Shoe Stuff:

  • My single favorite pair of shoes, without doubt, are my Trippen Wallet boots.   Love!  Lovelove!  Uberlove!
Majorly Comfortable?  Check
Make me Taller?  Check (I LOVE being taller than I am!)
Heel Height (over toe height) - Perfect
Look Great?  Check (OK, I know this is subjective, but aren't all shoes, really?)
Wonderfully Unique?  Check
Price?  Ouch.  Only on Sale.  :(
  • Other Brands I Like:  Beautifeel (the price on these has skyrocketed!), Reiker, Josef Seibel, Munro, Clarks...
  • Price:  You get what you pay for in shoes.  Even when I wasn't spending much $$ on clothes, I would spend on shoes  - nearly always on sale, though.  Cheap frugal, you know...  It seems that any pair of shoes that's under $100 (new, full price), just isn't worth it.  I would love to be proven wrong here though!
  • Used?  I have no qualms at all about buying used shoes!   Thrifted, eBay (if I know the brand and size).  If they look new, or nearly new, and especially if they're meant to be worn with socks, I have no ewww factor here.  Probably goes along with the cheap frugal gene, which, if I wasn't born with, I was definitely conditioned with from an early age.
Some examples of what I think works, and my issues (I'm very open to alternate viewpoints & suggestions here!):

The "vamp" style (I think that's what you could call this), with ankle strap,
is OK on a platform, because of the overall height they add.

Again, kind of OK with a shorter skirt, because of the platform,
but I'd like to find a better, and more comfortable, look.
Comfort-wise, these shoes are OK, but not for walking all day in!

Not good.
Not good at all.
And I have nothing to wear with this dress.
Nothing at all.   (Even the strappy platforms above just didn't cut it with this dress -
I think it's the black color.
Which brings me to color.  I think an orange/brown is a good color to pair with blue.   I wouldn't mind adding more colorful shoes to the mix, but maybe that would draw too much attention downward?   I wear a lot of green and would love to find some green shoes, but I've been looking.....not much luck.

Soooo..... what do I need to look for to wear with a knee-length skirt?  And where do I find them?  (I do know about Zappos, although I've not ordered from them, and frankly, when I found a pair of shoes  I liked there & started looking around, I could nearly always find them cheaper elsewhere)   What brands do you love?

And for the rest of you out there with vertically challenged legs, what are your secrets?

And on a side note, should I just get over my vanity issues with my fat knees?  (Yeah, I know...you haven't seen them yet....just trust me....they ain't pretty....)

I'm all ears....my feet are listening....

UPDATE:  Carolyn gave me a great lead to Clarks Shoes , which has a whole slew of shoes on sale at 40% off right now.  I was about to place an order ($8 flat shipping, returns are free) for $240 (gulp...but that's for 4 pair...), when I noticed the space for a coupon code.  I found a code (SCW12), entered it, and got a whopping $48 off my order!   Awesome!   I'll be happy if even 1 pair of these shoes work)  Thanks Carolyn!

Friday, July 20, 2012

The Li'l Ole Lady Dress Gone Wild

Sometimes a project just turns in to 'one of those things', aka "What was I thinking?", then "Can this even be saved???"

My initial issue here was one of fabric choice - I bought this circle/dot jersey from Emma One Sock a couple of years ago.  I loved the swatch, but when all the yardage arrived, all I could see was "little ole' lady" (henceforth known as LOL) fabric.   But hey, it was EOS fabric (translation = not cheap) and I was determined to find something I could use it for.  I kept interviewing it...almost hiring it....but it never quite made the grade.  

Enter Marcy Tilton's V8813.  I saw Barbara V's super cute version up close and personal, and pictures of several other successful versions, and thought this could be a great dress to help me overcome my long-standing Dress Aversion - funky, edgy, comfy, creative potential...what's not to like?  So I finally hired the LOL, combined it with some navy modal, and I thought "Yeah, this will work".  It looked like it was going to take longer to trace and cut than sew - super easy!  I got it mostly sewed up, and thought ... "Huh.   We no longer have the LOL dress, we have the LOL bathrobe!" 

Not the look I was going for.

Enter some of Marcy T's silk screens, and I thought "Yes, I can save it with this!"  I seriously wish I was one of those talented people who can really visualize the completed project in their mind, but I just ain't.  I'm a go-with-the-flow person, and I just have to watch it unfold and figure it out as I go.  In this case, I watched it unfold...and flow...and go...and fold up...and flow some more...and nip and clip....and rumple...and.... well.  You get the picture.

I really couldn't bear to take pictures along the way, so we'll just jump to the end result.


The construction:  Gratefully riding the coattails of those who have gone before me, I took the wise advice to do the gathering on the center front piece BEFORE sewing it on to the front side pieces.  Doing the gathers AFTER sewing it all together was, imho, the silliest possible advice in the pattern instructions!  I did the gathers themselves per the pattern instructions, using a zigzag over a length of perle cotton, then pulling up the gathers - easy peasy!

Mostly I followed all of the other instructions, which were very clear, very thorough, very good.  Until, of course, I completely stopped following instructions.

I cut a Small, and ended up bringing the V point of the neckline up about an inch.  I also took the side seams in by about 1" on each side (for a total of 4"), from the bottom of the sleeve to the top of the pocket, tapering at each end.  I used the View C pockets, with a contrast lining and faux piping.

The Embellishments, etc.:  I really should have taken shots of the bathrobe stage.   Really, you would SO agree with me that it looked like a bathrobe!  I hadn't sewn the center strip (the LOL) on when I started silk screening - thank heavens!  It's really hard enough trying to manipulate the fabric flat when just a few seams have unflattened it!  Dixie wrote a recent post with an excellent tutorial on her silk screening methods.  I aspire to her artistry, but meanwhile, I'm learning....here is a brief description of what I did, and the tools I used:

This was the last piece I screened onto the dress.
I used Marcy T's Riffle design, which is in place on the fabric,

a syringe to draw up the paint,
A squeegee (this was a larger one that I cut to size),
the paint,

and a touch-up brush.
What is not seen is VERY important - a bucket of water to place your screen in
immediately after using it, so that it doesn't clog up.
(ask me how I know that this is VERY important....)

Everything is laid out on a large plastic sheet on the floor, but the sheet really should be larger than this to catch the drips from the water bucket.
I drew up the paint in the syringe, and squeezed it out -
you can see the largish bead of paint on the left of the screen.
Too much is better than too little!
The squeegee is ready to push the paint through the screen as you pull the squeegee across.
I'm still learning how much pressure is required, but I'm discovering that more pressure is  good - I started with a tendency to not push hard enough.
After the paint has been drawn across the screen.
You then lift the screen off the fabric by lifting one side of the screen,
holding the fabric down,
and try not to make a mess of things.
The results.
This one wasn't too bad :)
After you let the paint dry, set it with a hot iron, and it's done!
After this I sewed in the center front piece (LOL), and assessed the situation.

It was now looking sort of like a hip, Asian version of the LOL bathrobe.    Still not ready for prime time.  I tried various shoes on with it.  No help.  I tried to manipulate the pockets in about 79 different variations of gathers and buttons and folds and stitches.   Some versions sort of worked, some not so much, but what was NOT working was the baggy pockets as designed.  In this fabric, in spite of the updated direction I was moving in, those pockets still screamed bathrobe! to me.  

The length.  Aha!  The length!   Too long on my vertically challenged bod.  I also just wasn't crazy about the uneven hemline - it wasn't until I took another look at the pattern pictures and realized that it's supposed to look like that ... I guess ... but it wasn't working for me.   Evening out the hemline meant, basically, cutting it WAY off grain.    Oh well, whatever works.  I tried trimming it.   Still too long.  Still uneven.

At this point, I figured, if it wants to be uneven, just let it be so, and embrace it.  Did I mention that this was a late night sewing session?  I was, without doubt, getting goofy.  You want uneven?  I'll give you uneven!  My version of embracing the unevenness was to do a serged rolled hem, stretching the kerfluvvin out of the fabric as I fed it through the serger, and I got the ultimate in wavy unevenness!

I had already decided on the pocket solution at this point, which was to stitch a fold in the center of each pocket and add buttons, completely changing the shape of the pocket opening and, I think, a better flow with the rest of this dress.   I used 4 unmatched clear, cut plastic vintage buttons from stash.

And called it done.  And fun!  And functional  :)

Well....not totally done, because now I need some new shoes, since nothing I have seems to work well with this dress (except maybe boots and leggings for Fall wear).   In the meantime, I have what I would call a fun knock-around-the-house playdress that could be dressed up a little and taken out to dinner, or funked up and taken out to a fun, arty event.   It's definitely comfy to wear; I worked through my LOL issues and now I can just have some laughs :)  (I  do have more of the LOL fabric though....what to do, what to do......)

Meanwhile, I'm happy with what I've got.  I'm wearing it now, and it might just stay on all day :)

Not the most figure-flattering piece,
but I'm going for comfort here, and in that mode, it fills the bill nicely :)
Random thought = Shoes.  I should write a post about shoes.  Not because I know a lot about them; more because of what I DON'T know!   

Saturday, July 14, 2012

A Bit More Ancient History - The Christening Gown - UPDATE w/ more pics

K and D enjoyed a fun and successful wedding in the desert :)   Fast forward a couple of years, and Baby has arrived!  The plans for celebrating this event included a christening in the mountains (any excuse for a road trip, right?).  In this case, it meant a camping trip to a gorgeous, way-off-the-beaten-path spot near a river up in the Sierras.  And what is Baby to wear?  A christening gown, of course!

I really wasn't sewing much those days...mostly the occasional home dec project, or doing some mending, but my horrid little Toss and Swear Singer was still chugging along, and I relished the thought of working with some of the yummy Pena Pineapple Cloth that I used in K's wedding dress.

This project went together quite smoothly, as I recall.  I know I used a pattern....which one, I have no idea.   If K had been responsible for saving the pattern, you can bet she would still have it!  Which means that I must have kept it, and it's long gone.  I don't think there are any photos documenting the event itself, so you'll have to picture a California High Sierra scene, babbling creek running over a rocky stream bed, hardy bushes like toyon and chamaebatia foliolosa (we learned to identify this plant and say the words, and I swear I will remember them until the day I die!), majestic pines and hidden wildflowers peeking through the crumbled brown leaves on the forest floor....that sort of rugged beauty that only a high mountain setting can provide.

UPDATE:  I should have known - there ARE pics of the Christening Site :)
Playing on the Rug :)

"I'm a bit disappointed that Aunt Jilly didn't finish the seams on this dress." 
(thanks Gloria)

Mom and Baby at the Site

Me w/ Baby :)

It was, I believe, late summer, and Baby just BARELY fit into the gown by the time we made the trip (I think we might have initially planned it for Spring....or maybe I was just slow in getting it done...) I'm not sure, but we might not have been able to button the single button at the back of the neck.   But christen her we did, using the fresh, clear river water, and in the presence of all that nature offers.   It was lovely.  :)

K delivered the gown to me along with her wedding dress, and I noticed several stains on it.  Since it's been in storage all these years, and never washed, I figured the stains must have been from the river water.  I hand washed it in Eucalan, and it cleaned up beautifully.   Here she is:
Materials used:  A soft, yummy cotton, 
pina fiber (pineapple cloth) that had been used in her Momma's wedding dress,
cotton lace (I believe this was from my stash of vintage lace), and satin ribbon


Not too bad a job on the pin tucks *whew*
I think I was pretty good at making those ribbon roses by then!

One little pink pearl button.   Love that :)

That lovely Pina!

And......yep, here go again.......wait for it......

Unfinished Seams.
*sigh*
I have nothing more to say about this.


This has been a delightful stroll down memory lane for me :)   And now it's time to move into the future - I'm opening an Etsy shop!  I'll have a grand opening announcement when the shelves actually have something in them (I've actually made my first official sale...but you'll have to wait for the story....)

Meanwhile, I'm just happy to have my comments avatar back, a me-project on the cutting table, and lots of hope for the future.   May we all share a bit of joy and hope with someone else today :)

Edit to add:  I just realized this is my 100th post!  I should celebrate with.....something....happy 100 to me!  :D

Thursday, July 12, 2012

Help! My Comment Avatar is MIA


I believe I inadvertently deleted the avatar that's been showing up on the comments I make, and now I have this big ugly minus sign next to my name on all my comments :(.   I am NOT a minus sign!!!!

When I right click on the image, it has a jpeg name, and under that it says 1,159/1,159 B Server Problem  (if any geeks understand what that means.....help?)

If you click on my name by the comment, it still goes back to my blogger profile (which has a normal picture).   I changed the image (several times) on my google profile, but nothing changed in my comments.  I even 'upgraded' to Google +, thinking that might help......nope.

And to top it off, Google said my Operating System was too ancient & updates were no longer going to be available, so I bought the upgrade for my Mac (from 10.5.3 to 10.6.3).....still nothing.

And yes, I've cleared my cache and history and all the usual clean-up stuff - no go there....

I suspect that maybe I'll need to go somewhere and change some code from something to something else..... but where?  and what?  and how?  and HUH?

*sigh*

Anyone?

Help!!!!

Update:  I joined the blogger forum so that I could ask a question, and found two other people who posted the exact same problem....months ago....with no  response on the forums.   I asked my question; we'll see if anyone over there actually reads the postings....... (can you tell I'm not real hopeful?)  Prove me wrong, blogger geeks!

Update #2, The Fix:  I still have no idea where my old avatar was stored; I suspect that, way back when I first created the blog, the code for the original avatar must have gotten buried somewhere...who knows where!?   The new avatar is, I believe, where it's supposed to be - it  is the picture associated with my blogger profile - the one you see when you click on the "view my complete profile" link on my blog page.  I clicked on "Edit Profile".   I selected a picture in Picasa, re-sized it to 50 x 50, deleted my old profile pic, replaced it by adding the URL to the new 50x50 pic, and voila! I have a picture back.   A nice, simple fix, and not worth all the angst I had staring at the minus sign (which is still there on all my old comments - this is why I suspect the code for that original pic is still buried .... somewhere .... but I'm done searching for it!   Hope this helps anyone else who might be having the same problem :)

Wednesday, July 11, 2012

A Wedding in the Desert - 26 years ago


Back in the olden days, when we were still (relatively) young and (relatively) carefree, my good friend K was about to get married (coincidentally, to a man I had introduced her to), and we were having a conversation that went something like this:

K - I want him to wear a tux
Me - OK.  And what will you wear?
K - It doesn't matter.  I just want to see him in a tux.
Me - If he wears a tux, you have to wear a wedding dress.  That's how it works.
K - Nooooooooooo.........
Me - Yesssssssssss...........
K - Nooooooooooo......... (have you figured out that K was/is simply not a dress-up sort of person?)

I was still sewing occasionally back then, so you can guess what happened next.   Yup, I made a wedding dress.  I must have had some balls back then!  Either that, or I was just utterly clueless.....  I suspect it was a combination of the two.   Clueless and ballsy.  Frightening.

Fast forward 20 years or so, during which very little sewing happened, and here I am now, at it again and sewing up a storm in a sometimes semi-obsessive manner.   And I've been wanting to get my hands on that dress again....sort of.  A part of me has been terrified of seeing what sins lurked within the seams of that dress, but morbid fascination won out, and finally K delivered the dress for my inspection.

I'm both delighted and horrified.

Back to the beginning.   I started with some sketches.  It's no surprise to me that K actually still HAS the sketches - she's a keep-all-mementos sort of person.


I remember searching for a pattern close to this, and not finding much....I know I bought a pattern that gave me something of a starting point; mostly I remember just draping and fitting on her...why does the thought of doing something like this nowadays seem so far beyond me???   I tell ya, the ballsy cluelessness of youth....

The good news:   It fit her and flattered her, and she was the quintessential radiantly beautiful bride!


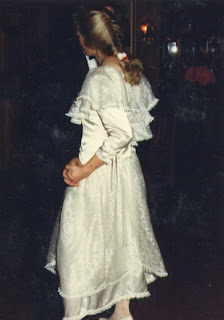
(yes, that's me hugging the groom - in a RTW dress)

And, by request, one fuzzy pic showing me way back when... I now remember that Kim had her hair done (beautifully!) at a local shop, and she talked me into having them "do" my hair too.  Her hair = perfect.  Mine? An uber-curly disaster.   Oh well.  Her hairs were the important ones!  ;D


The Inspection:

I must admit, the dress really does look pretty well constructed.  On the outside.
Here's the real treasure in this dress.  The lace is pina, or pineapple fiber, from the Phillippines.  K's aunt had a wedding dress made from this lace, which she gave to K.  All I remember about the original dress is yards and yards of gathered skirt!  I used nearly all of it in this dress (some got used in K's daughter's christening gown...which I also have and will blog about).  The cloth is something that needs to be seen and fondled - it's one of the most amazing fabrics I've ever had the pleasure to work with.  Shimmery, fine,  stable, delicate looking but tough as iron - an absolute delight to sew!


Apparently I thought that 20 pearl buttons with loops were a better idea than a zipper:

I even added squares of ribbon as backing for each button!  Note that the bodice is fully lined.  :)

All in all, not so bad for someone who really was in way over her head.

Right.  OK.  But...... Are you ready for this?   Wait for it.....

AAARRRRGGGGGGHHHHHH!!!!
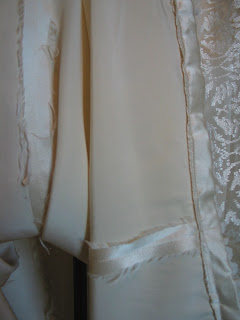
Those seams!!!! OMG those SEAMS!!!!!
Silk Charmeuse.  NO seam finishing.  Nothing.  Nada.
Slowly fraying and shredding away.
And check out the shoddy hemming on the right.
Eeep.
:-(
*sigh*

At least I used a triple seaming technique on the armholes.  Not pretty, but I guess you could call it sturdy.


I suppose I could say I was pressed for time?  Considering all of those buttons, carefully lined up and backed, handmade ribbon roses, etc., I don't think that excuse will fly.  Honestly, I knew better.  I swear finished seams were drilled into me by my darling Mumsy when I was a wee one, learning to sew.   Maybe I was going through a rebellion?   But on a WEDDING DRESS?   

*sigh*

The dress is in my hands for the moment, and I'll have to see what I can do to save and preserve those seams. K's daughter is an artist who, to my knowledge, has never been seen in a dress-up dress like this in her entire life (she wore a simple cotton print frock to her H.S. prom), so who knows if this dress will ever be worn again?   But I think I owe it to the sewing and seaming goddesses of the universe to do SOMETHING about those seams....

And I hereby make a promise...out loud...to me and everyone who reads this, that I will never commit such a sewing sin again!

How about you?  Have you had a chance to inspect something you made from eons past?  And what was your reaction when you saw it?  What is your best (or worst!) unfinished seam story?   (please make me feel better!!!)  ;-D

Tuesday, July 10, 2012

Stella the Sassy Steampunk Bustle

A good friend, who shows her (amazing!) art wares at steampunk events,  asked me if I would be willing to make her a bustle.   Hmmmmm......   She said she would send me all of the materials, and give me total freedom to do anything I wanted with them - the wilder, funkier, and crazier, the better! With terms like that, how could I resist?  And as she says, she "wanted the bustle to wear at art festivals since a drab artist is no fun at all."  Here is her website, Camryn Forrest Designs - she makes the most unique and intricate and beautiful waterglobes/snowglobes/art creations - each one is an experience!  She has an Etsy Shop as well - Camryn Forrest on Etsy   Check it out!

Since everything I knew about bustles could fit through an eyelet on a corset, I had a bit of research to do.   I had lots of fabulous fantasy pictures rolling around my brain, but construction-wise...hmmmmmm....  I nearly got permanently stalled at step one, how to do the waistband.  Waistband?  Hipband?  Straight?  Curved?  Stretchy material?  Stable?  Would it fit over the corset or under it?  Could I make something that could fit at either the waist or the hip?  What kind of closure?   Once I got through all of that (we decided to do a waistband that would fit over the corset), and I had the band made, the fun began!!!

And oh.  my.  Did I ever have fun with this!


The Evolution:

I wanted to drape a base fabric from the waistband, and figured out how to do this by attaching strips of binding from the band:
There's something just a tad obscene about this pic,
but  you have to start somewhere...

Then attached the base fabric to the waistband


Next I just started draping and pinning and sewing and playing and planning...
and generally staying up way too late having too much fun!  :D

It's starting to take shape..... (everything is just pinned at this point)

In spite of my friend insisting that she would love whatever I did, when you're sewing for someone else....well, you know how it can be....   I was overloading her with pictures, saying, "What about this?  Let me know what you think...too much?  too little?...more of this?   less of that?   She was oohing and ahhing over every little thing I did, and I think that eventually I DID start to believe that she really liked whatever I was doing :D

And.....the completed Stella:  (UPDATE:  Egged on by a comment from Camryn - quote "More is more" /quote, I...welllll....added more :D.   And tweaked a bit here and there, so I'm replacing the formerly finished Stella photos with the really (for now) finished Stella:


Eventually I will (hopefully!) have some pics of Stella being worn in full regalia.  :D

Oh, and I've been talked in to making some more, too.  Twisted my arm, really hard, she did  (not).  ;-D

Hope you're having fun, whatever you're "working" on  in your creative space...... :-)